> ## Documentation Index
> Fetch the complete documentation index at: https://docs2.growthbook.io/llms.txt
> Use this file to discover all available pages before exploring further.
# Official GrowthBook for Framer Plugin
> How to integrate GrowthBook with Framer, making it easy to connect feature flags and experiments with Framer components for no-code A/B testing.
## Overview
The GrowthBook Framer plugin makes it easy to run A/B tests right inside your Framer projects. Assign visitors to different versions of your design (like layouts, headlines, or calls to action), track results, and confidently choose the best experience for your audience.
### How It Works
Here’s a high-level overview:
1. **Create an experiment in GrowthBook**: Define your variants and set your goals—like increasing clicks or signups.
2. **Connect the experiment to Framer**: Use the GrowthBook plugin to assign different components to each variant.
3. **Track and measure**: Track which variant users see using GA4, then analyze the results in GrowthBook (via BigQuery).
### Requirements
You'll need:
* A [**GrowthBook account**](https://growthbook.io/) (free and open source!)
* **Google Analytics 4** (GA4) set up on your Framer site. Framer has a [step-by-step guide](https://www.framer.com/help/articles/how-to-set-up-google-analytics/) for setting up GA4.
* A **BigQuery** project linked to your GA4 account (for analyzing results)
**Need help setting up GA4 or BigQuery?**
Check out our [Google Analytics 4 and BigQuery docs](/guide/GA4-google-analytics).
## Installation
* Install the [GrowthBook plugin from the Framer Marketplace](https://www.framer.com/marketplace/plugins/growthbook/).
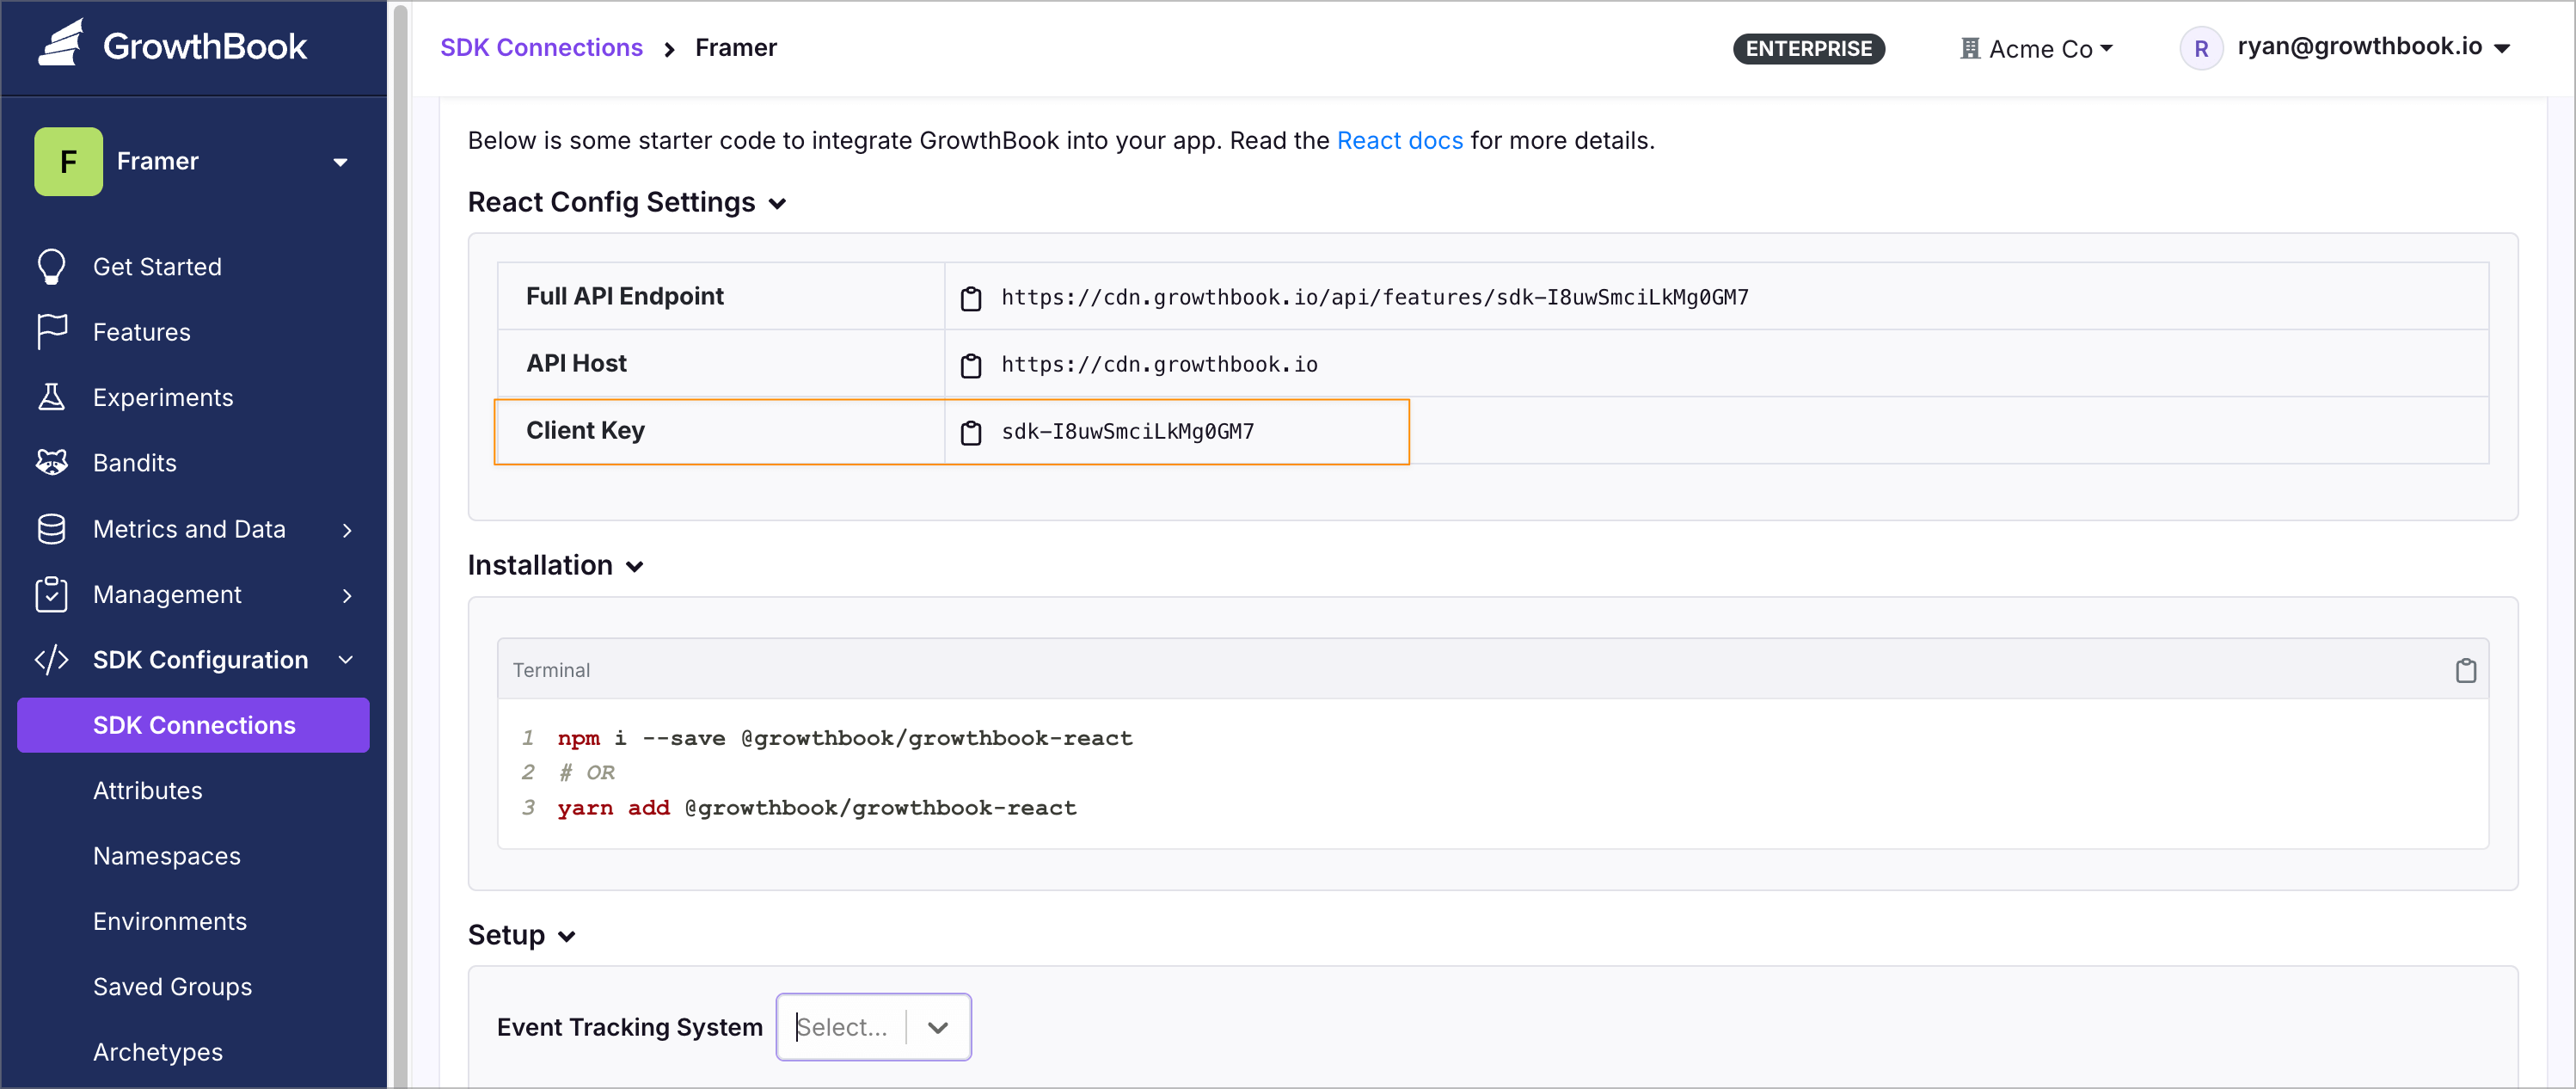
* In GrowthBook, go to **SDK Configuration** → **SDK Connections** and click **Add SDK Connection**. Call the connection something like "Framer" and choose **React** as the SDK Language (don’t worry—this works even if you’re not using React directly).
* Copy the **Client Key** from GrowthBook, paste it into the Framer plugin **Settings**, and click **Save**.
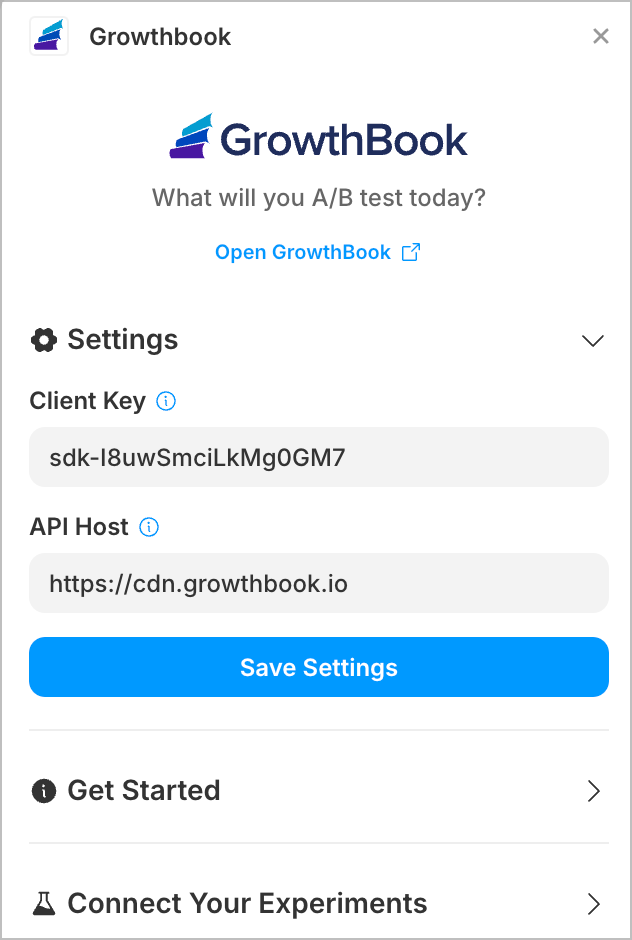 The plugin is now ready to use!
## Launch an Experiment
In GrowthBook, feature flags are the underlying mechanism for experiments. You can think of flags like trucks and A/B tests as the cargo they carry. (Other types of cargo might include targeting rules, progressive rollouts, and more.)
Now that you have the plugin installed, we'll walk through the steps to launch an experiment.
### Create a Feature-Flag Experiment in GrowthBook
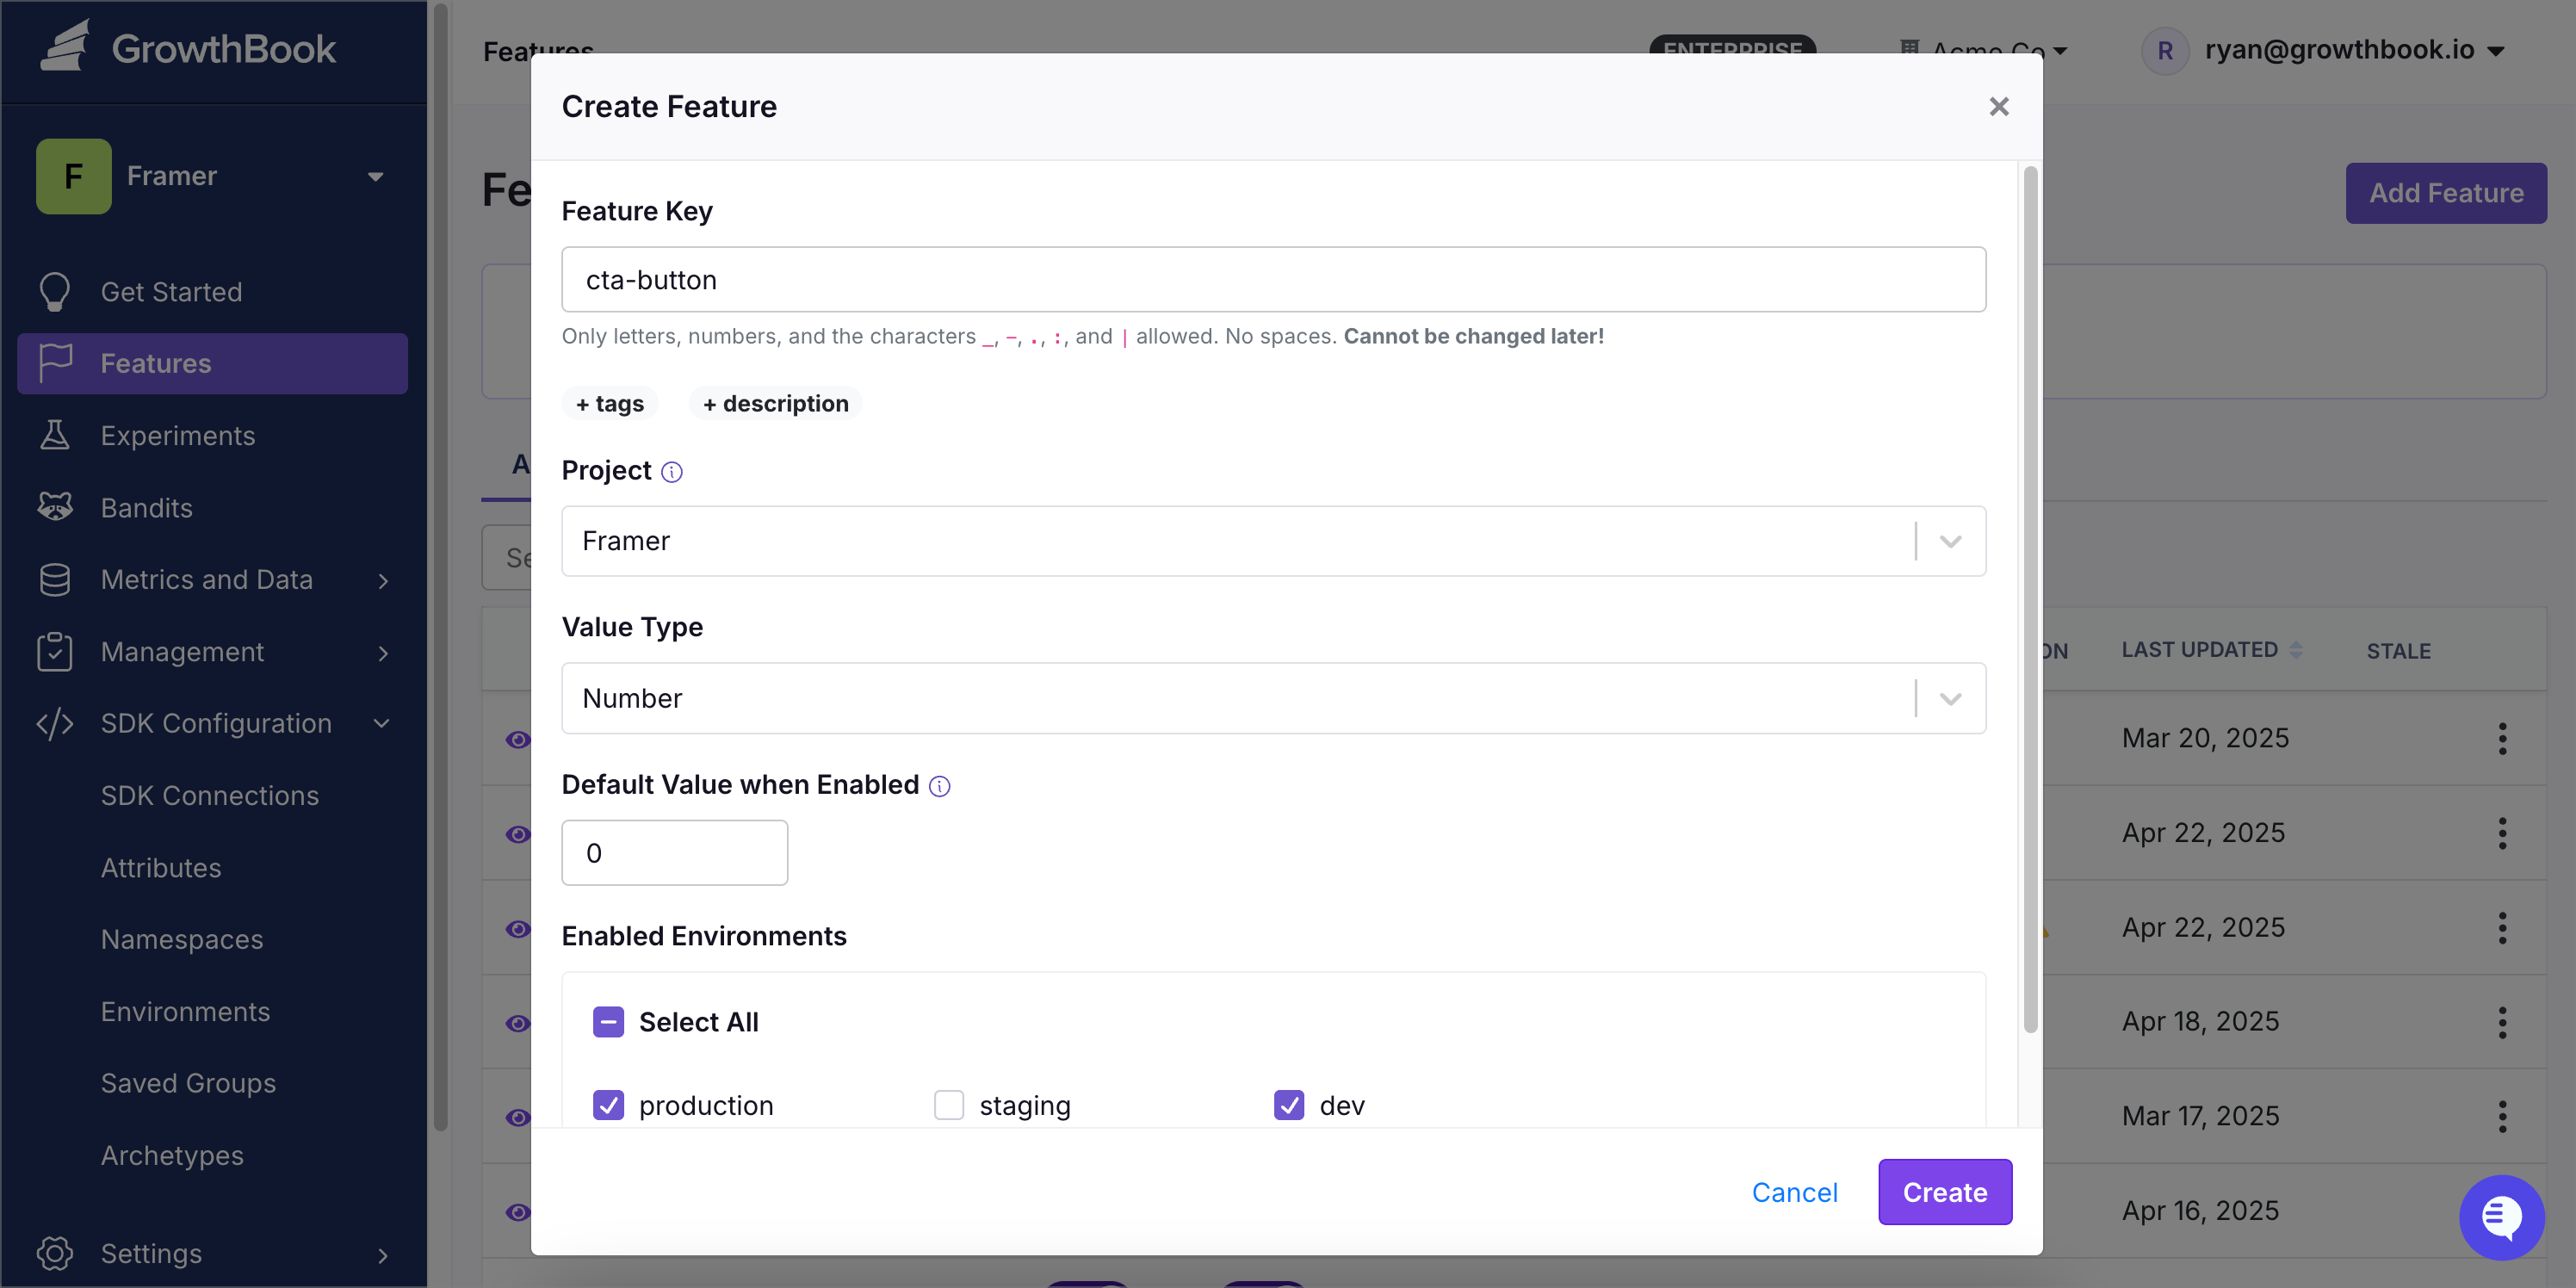
* In GrowthBook, go to **Features** and click **Add Feature**.
* Give the feature a name and for the **Value Type**, choose `Number`, change the **Default Value when Enabled** to `0`, and click **Create**.
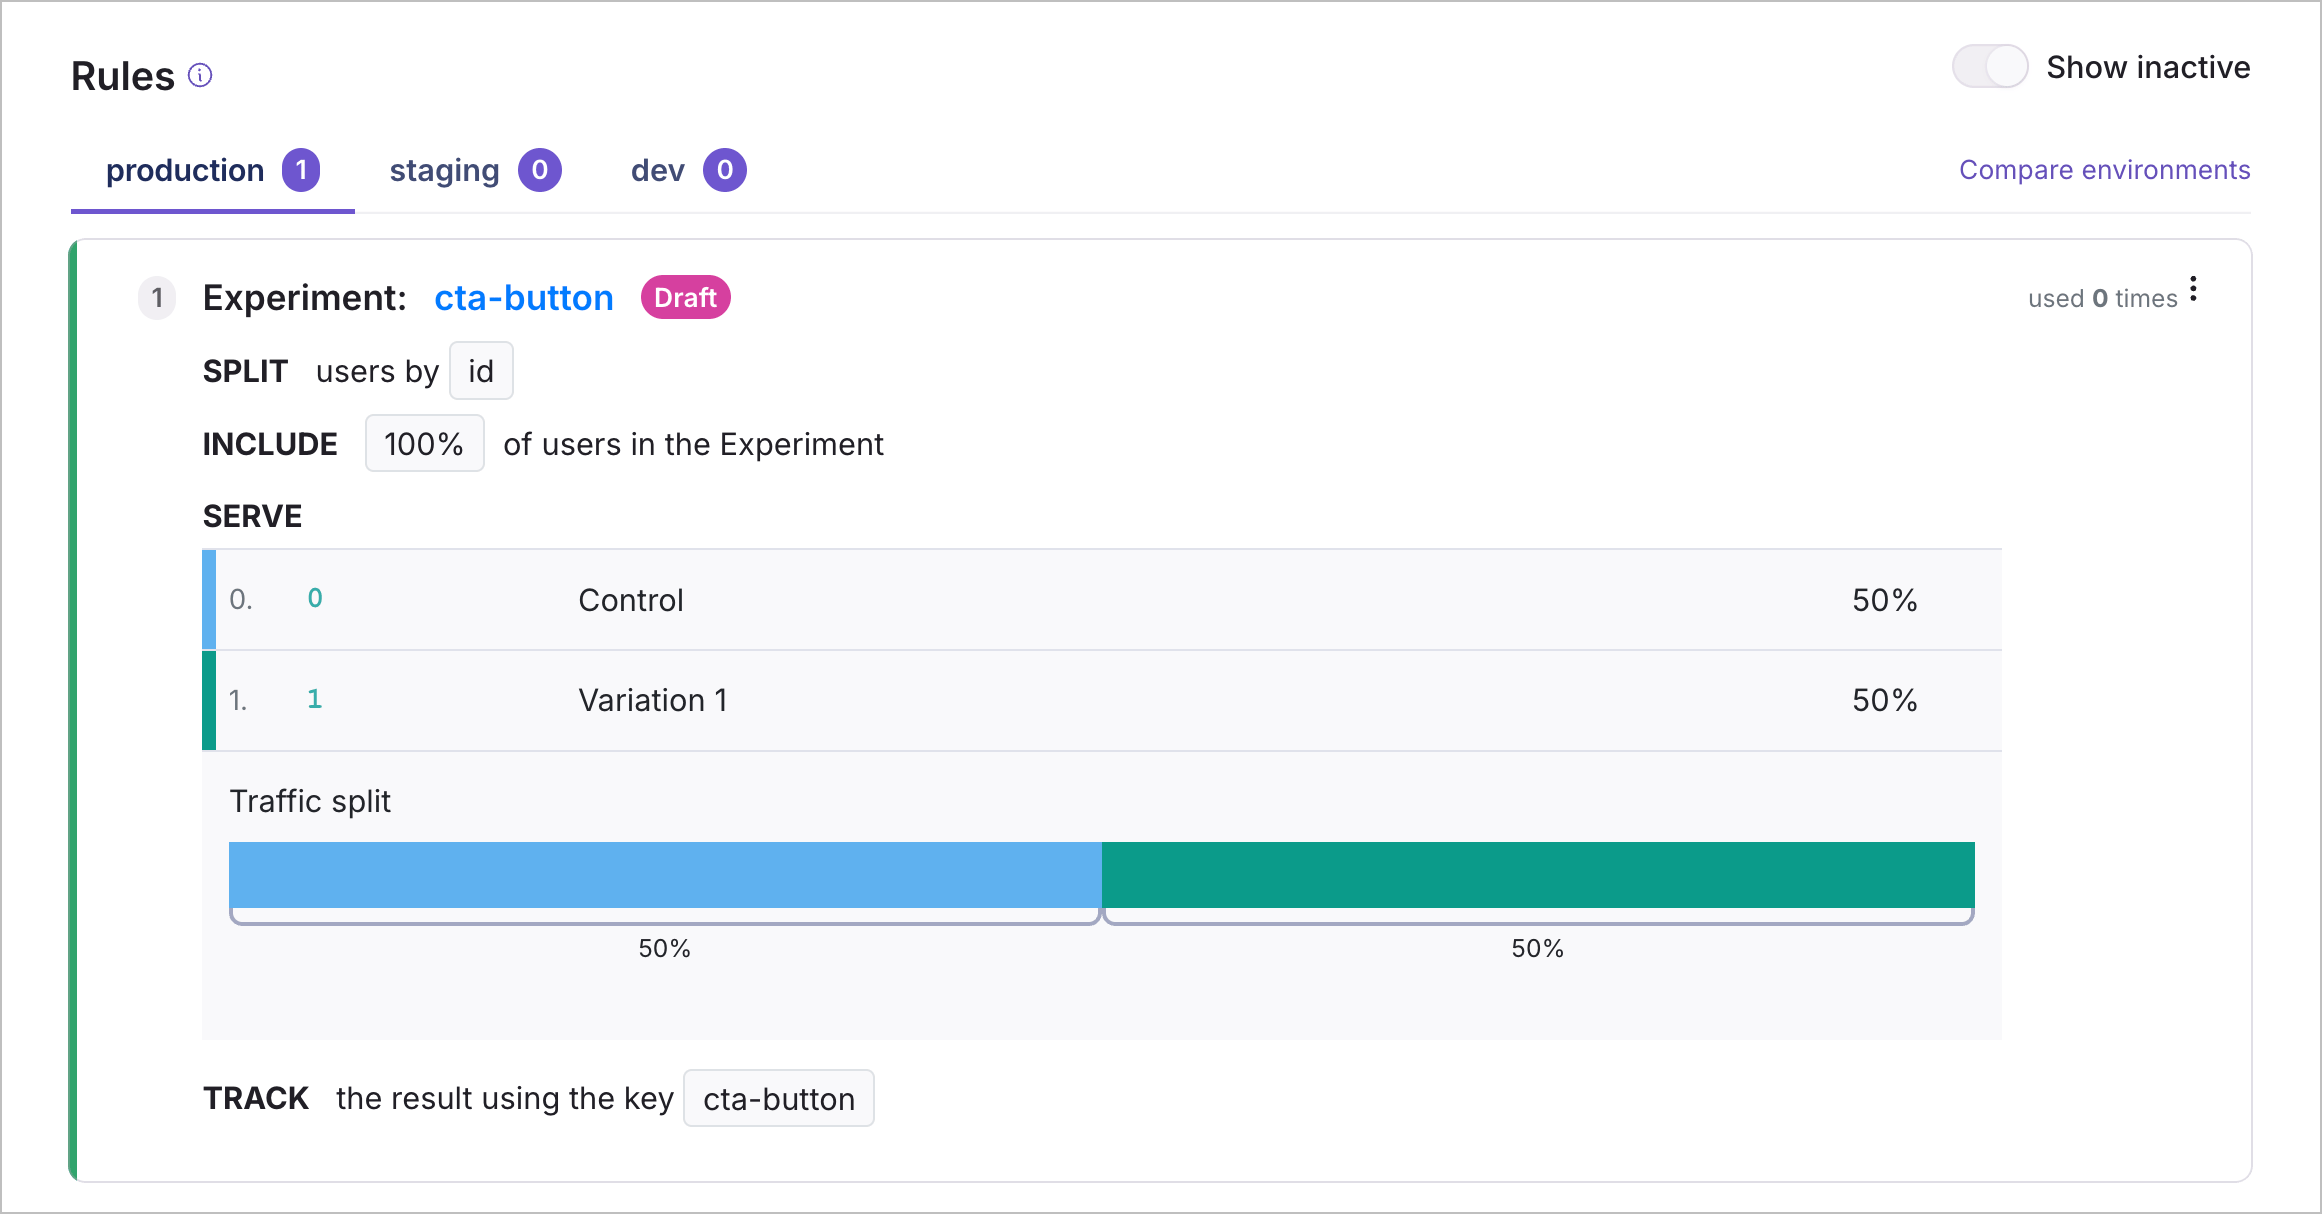
* Under Rules, click **Add Rule** and choose **Experiment**.
* Follow the prompts to create a new experiment, adding more variants as needed.
* Under **Data Source**, select your data source and choose **Goal Metrics** that you'd like to test against. (You can choose or change this later.)
* Click **Review & Publish** to make the experiment live.
The plugin is now ready to use!
## Launch an Experiment
In GrowthBook, feature flags are the underlying mechanism for experiments. You can think of flags like trucks and A/B tests as the cargo they carry. (Other types of cargo might include targeting rules, progressive rollouts, and more.)
Now that you have the plugin installed, we'll walk through the steps to launch an experiment.
### Create a Feature-Flag Experiment in GrowthBook
* In GrowthBook, go to **Features** and click **Add Feature**.
* Give the feature a name and for the **Value Type**, choose `Number`, change the **Default Value when Enabled** to `0`, and click **Create**.
* Under Rules, click **Add Rule** and choose **Experiment**.
* Follow the prompts to create a new experiment, adding more variants as needed.
* Under **Data Source**, select your data source and choose **Goal Metrics** that you'd like to test against. (You can choose or change this later.)
* Click **Review & Publish** to make the experiment live.
 ### Configure the Experiment in Framer
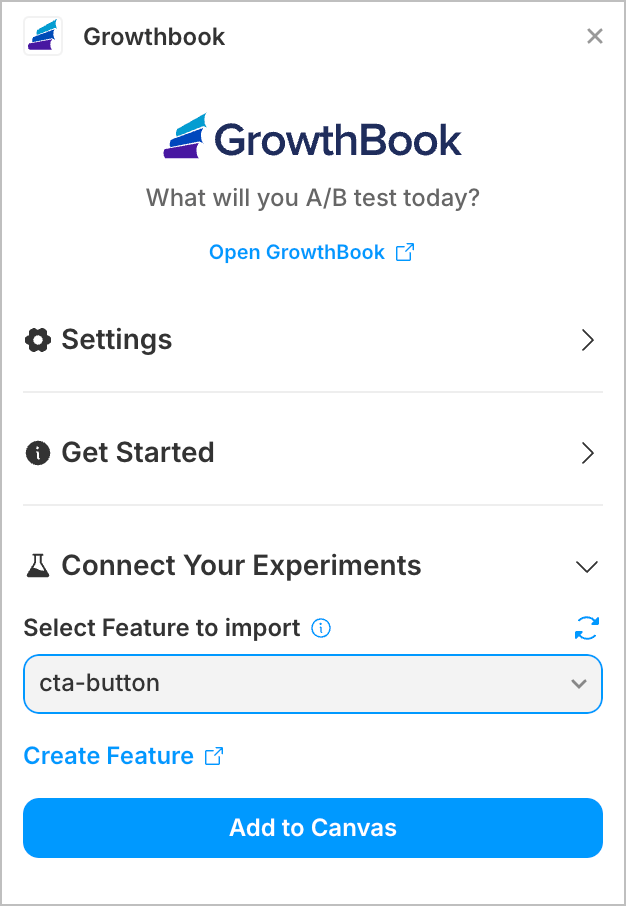
* In Framer, open the GrowthBook plugin and select the feature flag you created in the previous step. (Click the refresh icon if you don't see it.)
* Click **Add to Canvas** to add the GrowthBook component.
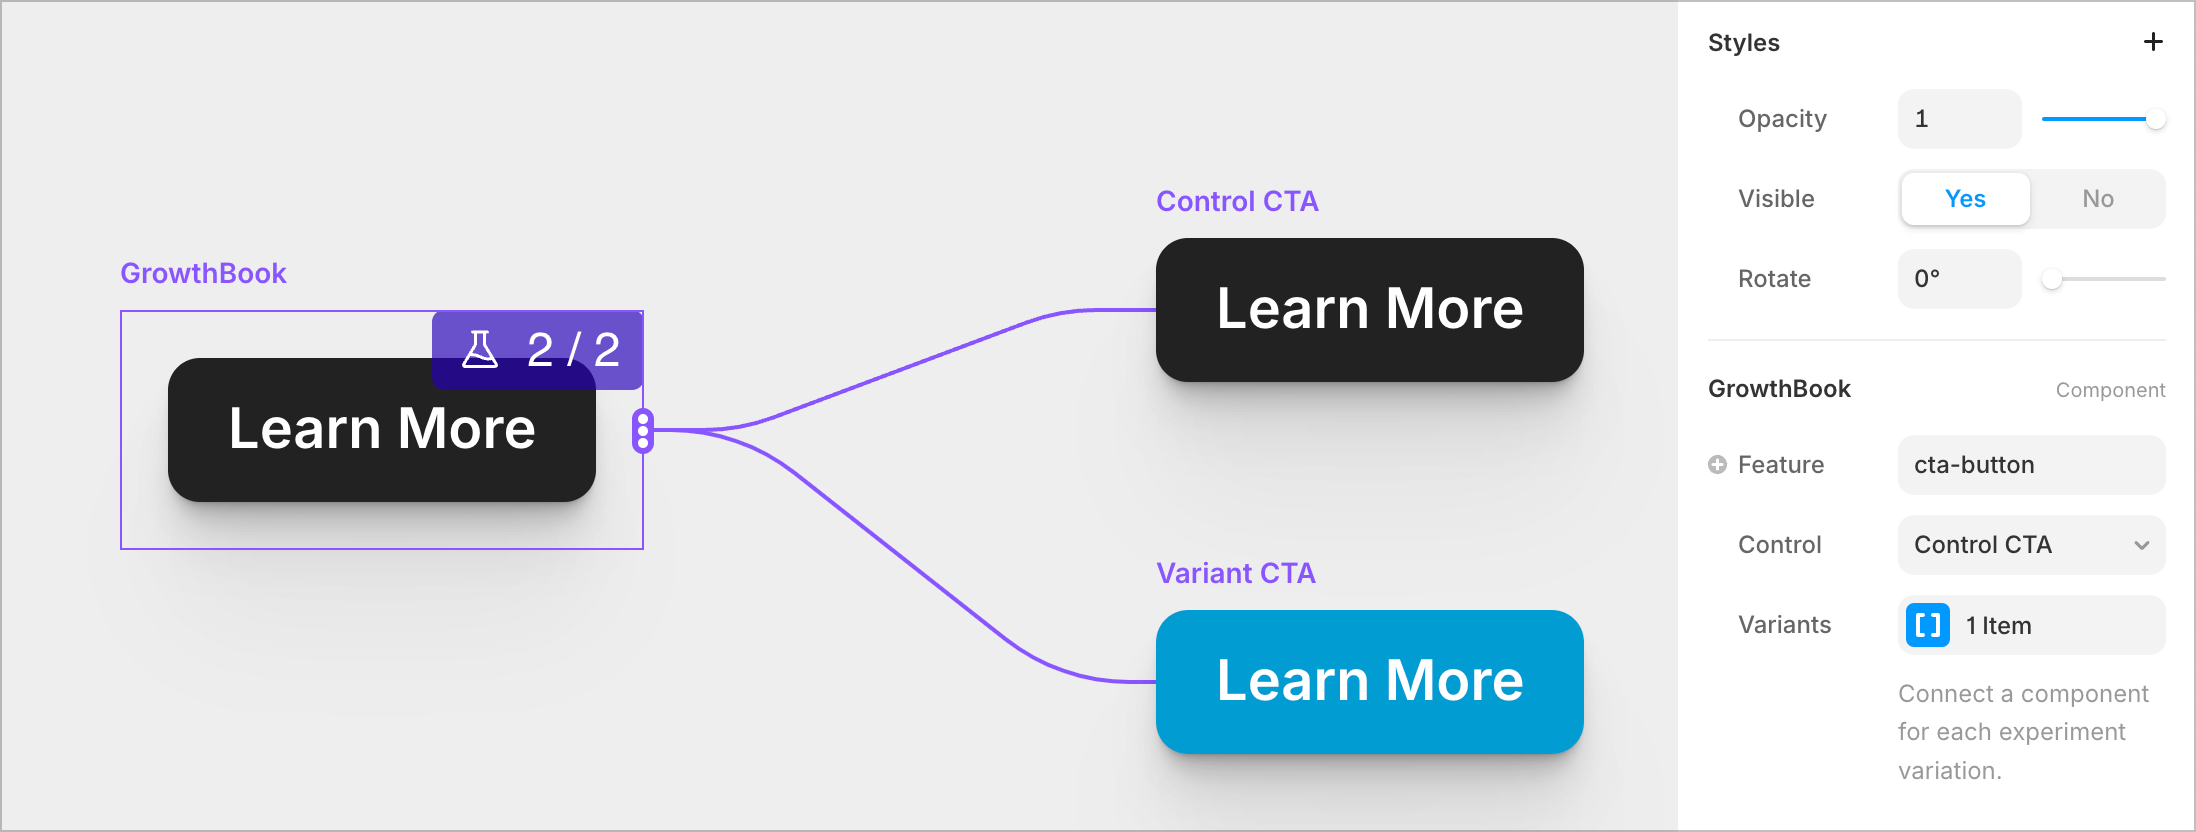
* Connect the **Control** to your default component.
* Connect additional components for the **Variants**.
* Add the GrowthBook component to your site.
* Publish your changes and you're live!
### Configure the Experiment in Framer
* In Framer, open the GrowthBook plugin and select the feature flag you created in the previous step. (Click the refresh icon if you don't see it.)
* Click **Add to Canvas** to add the GrowthBook component.
* Connect the **Control** to your default component.
* Connect additional components for the **Variants**.
* Add the GrowthBook component to your site.
* Publish your changes and you're live!
 ## FAQ
### How can I see if the experiment is working?
Use [GrowthBook Dev Tools](/tools/chrome-extension) to test, debug, and override experiments. The Chrome/Firefox extension makes it easy to understand and test your A/B experiments.
### Why do I need to use a numeric feature flag?
The Framer plugin uses numbers to choose between your components, where `0` is your control (default). `1` is your first variant, `2` is your second, and so on. These numbers match the order of the variants in the GrowthBook experiment.
### Which targeting attributes are supported?
[Target specific users or devices](/features/targeting) for your experiment by using targeting attributes, like showing a certain element to users on mobile.
Several targeting attributes are supported out of the box:
* `id`
* `url`
* `path`
* `host`
* `query`
* `pageTitle`
* `deviceType` (mobile or desktop)
* `browser` (chrome, edge, firefox, safari, or unknown)
* `utmSource`
* `utmMedium`
* `utmCampaign`
* `utmTerm`
* `utmContent`
See the docs for how to [create custom targeting attributes](/lib/script-tag#adding-custom-attributes).
### How do I track experiment results?
The plugin [automatically sends exposure events](/lib/script-tag#tracking-experiment-views) for GA 4, Google Tag Manager (GTM), and Segment.
GTM users will need to add a new trigger. We have a full walkthrough on how to configure this in our [GTM docs](/guide/google-tag-manager-and-growthbook).
**Other event trackers and data warehouses**
We support other event trackers and data warehouses, but they'll require some additional setup. Get in touch with us to learn more.
### How do I export the experiment results to BigQuery?
You'll need to connect your GA 4 property (or data warehouse) to BigQuery. See the [BigQuery docs](/guide/bigquery) for more info.
### What if I have more questions?
Join our [Slack community](https://join.slack.com/t/growthbookusers/shared_invite/zt-2xw8fu279-Y~hwnfCEf7WrEI9qScHURQ) to ask questions and get help from the GrowthBook team and other users.
## FAQ
### How can I see if the experiment is working?
Use [GrowthBook Dev Tools](/tools/chrome-extension) to test, debug, and override experiments. The Chrome/Firefox extension makes it easy to understand and test your A/B experiments.
### Why do I need to use a numeric feature flag?
The Framer plugin uses numbers to choose between your components, where `0` is your control (default). `1` is your first variant, `2` is your second, and so on. These numbers match the order of the variants in the GrowthBook experiment.
### Which targeting attributes are supported?
[Target specific users or devices](/features/targeting) for your experiment by using targeting attributes, like showing a certain element to users on mobile.
Several targeting attributes are supported out of the box:
* `id`
* `url`
* `path`
* `host`
* `query`
* `pageTitle`
* `deviceType` (mobile or desktop)
* `browser` (chrome, edge, firefox, safari, or unknown)
* `utmSource`
* `utmMedium`
* `utmCampaign`
* `utmTerm`
* `utmContent`
See the docs for how to [create custom targeting attributes](/lib/script-tag#adding-custom-attributes).
### How do I track experiment results?
The plugin [automatically sends exposure events](/lib/script-tag#tracking-experiment-views) for GA 4, Google Tag Manager (GTM), and Segment.
GTM users will need to add a new trigger. We have a full walkthrough on how to configure this in our [GTM docs](/guide/google-tag-manager-and-growthbook).
**Other event trackers and data warehouses**
We support other event trackers and data warehouses, but they'll require some additional setup. Get in touch with us to learn more.
### How do I export the experiment results to BigQuery?
You'll need to connect your GA 4 property (or data warehouse) to BigQuery. See the [BigQuery docs](/guide/bigquery) for more info.
### What if I have more questions?
Join our [Slack community](https://join.slack.com/t/growthbookusers/shared_invite/zt-2xw8fu279-Y~hwnfCEf7WrEI9qScHURQ) to ask questions and get help from the GrowthBook team and other users.