> ## Documentation Index
> Fetch the complete documentation index at: https://docs2.growthbook.io/llms.txt
> Use this file to discover all available pages before exploring further.

# How to Feature Flag and A/B Test with GrowthBook and Strapi

> Learn to implement feature flags and A/B testing by integrating Strapi CMS with GrowthBook. Step-by-step tutorial for content experiments, feature flags, and dynamic testing without developer intervention.

<Frame>
  <iframe style={{aspectRatio: "16/9", width: "100%", height: "auto", marginBlockEnd: "1rem"}} width="560" height="315" src="https://www.youtube.com/embed/grYlfKNFHCk?si=iJZzVFYzdGuUE5er" title="YouTube video player" frameBorder="0" allow="accelerometer; autoplay; clipboard-write; encrypted-media; gyroscope; picture-in-picture; web-share" referrerPolicy="strict-origin-when-cross-origin" allowfullscreen />
</Frame>

Want to A/B test your content without changing code for every experiment? This tutorial shows you how to integrate [Strapi](https://strapi.io/) with [GrowthBook](https://growthbook.io), enabling you to feature flag and A/B test your content directly from your CMS.

<Frame>
  <video src="https://mintcdn.com/growthbook-ea15456d/66H-dO8hZfIFVUdN/static/videos/guides/strapi-demo.mp4?fit=max&auto=format&n=66H-dO8hZfIFVUdN&q=85&s=ead02d141a048fbbbb2f8e7813011946" loop autoPlay muted style={{width: "100%", aspectRatio: "16/9", marginBlockEnd: "1rem"}} data-path="static/videos/guides/strapi-demo.mp4" />
</Frame>

In this tutorial, you'll learn how to:

* Set up content in Strapi for feature flagging and A/B testing
* Create feature flags and experiments in GrowthBook
* Configure a Next.js frontend with Strapi and GrowthBook to dynamically serve content

By the end, you'll have a robust system for easily testing content variations with GrowthBook and Strapi!

## Prerequisites

Before starting, ensure you have:

* A [Strapi](https://strapi.io/) project
* A [GrowthBook](https://growthbook.io) account
* A [Next.js](https://nextjs.org/) project with basic Strapi and GrowthBook integrations set up
  * See Strapi's guide and example for [integrating Strapi with Next.js](https://strapi.io/integrations/nextjs-cms).
  * See our guide and example for [integrating GrowthBook with Next.js](/guide/nextjs-app-router).

## Create Content in Strapi

This integration is flexible enough that we can use nearly **any Strapi content** with feature flags or A/B tests. The only requirement is to return an array of objects (like components).

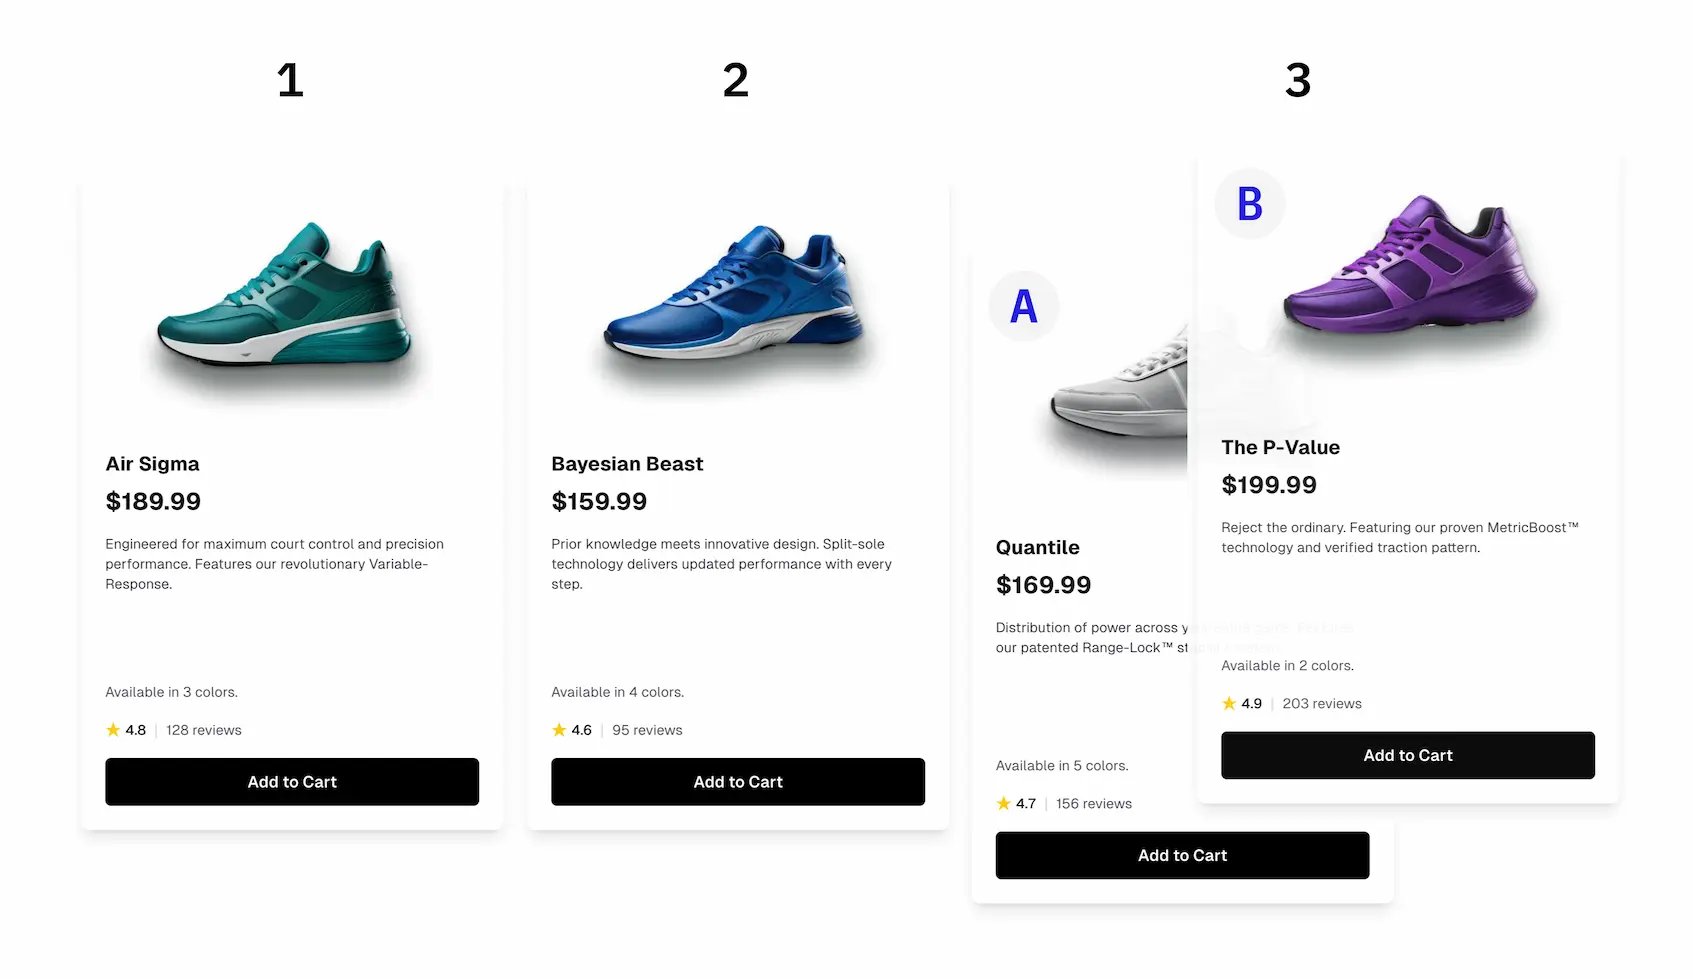
For this tutorial, we'll create a Product collection with a **Dynamic Zone** field that holds Product Card components. [Dynamic Zones](https://docs.strapi.io/dev-docs/backend-customization/models#dynamic-zones) let us create multiple variations of content within a single collection—perfect for A/B testing different versions. On our frontend, we'll show 3 shoe product cards and use GrowthBook to A/B test which shoe is displayed in the third spot.

<Frame>
  <img src="https://mintcdn.com/growthbook-ea15456d/4KUzUtpaNUGa50Xc/static/images/guides/strapi-ab-test-example.webp?fit=max&auto=format&n=4KUzUtpaNUGa50Xc&q=85&s=39f03632ead3f7bc186597af902231c0" alt="Strapi A/B test example" width="1693" height="979" data-path="static/images/guides/strapi-ab-test-example.webp" />
</Frame>

### Product Card Component

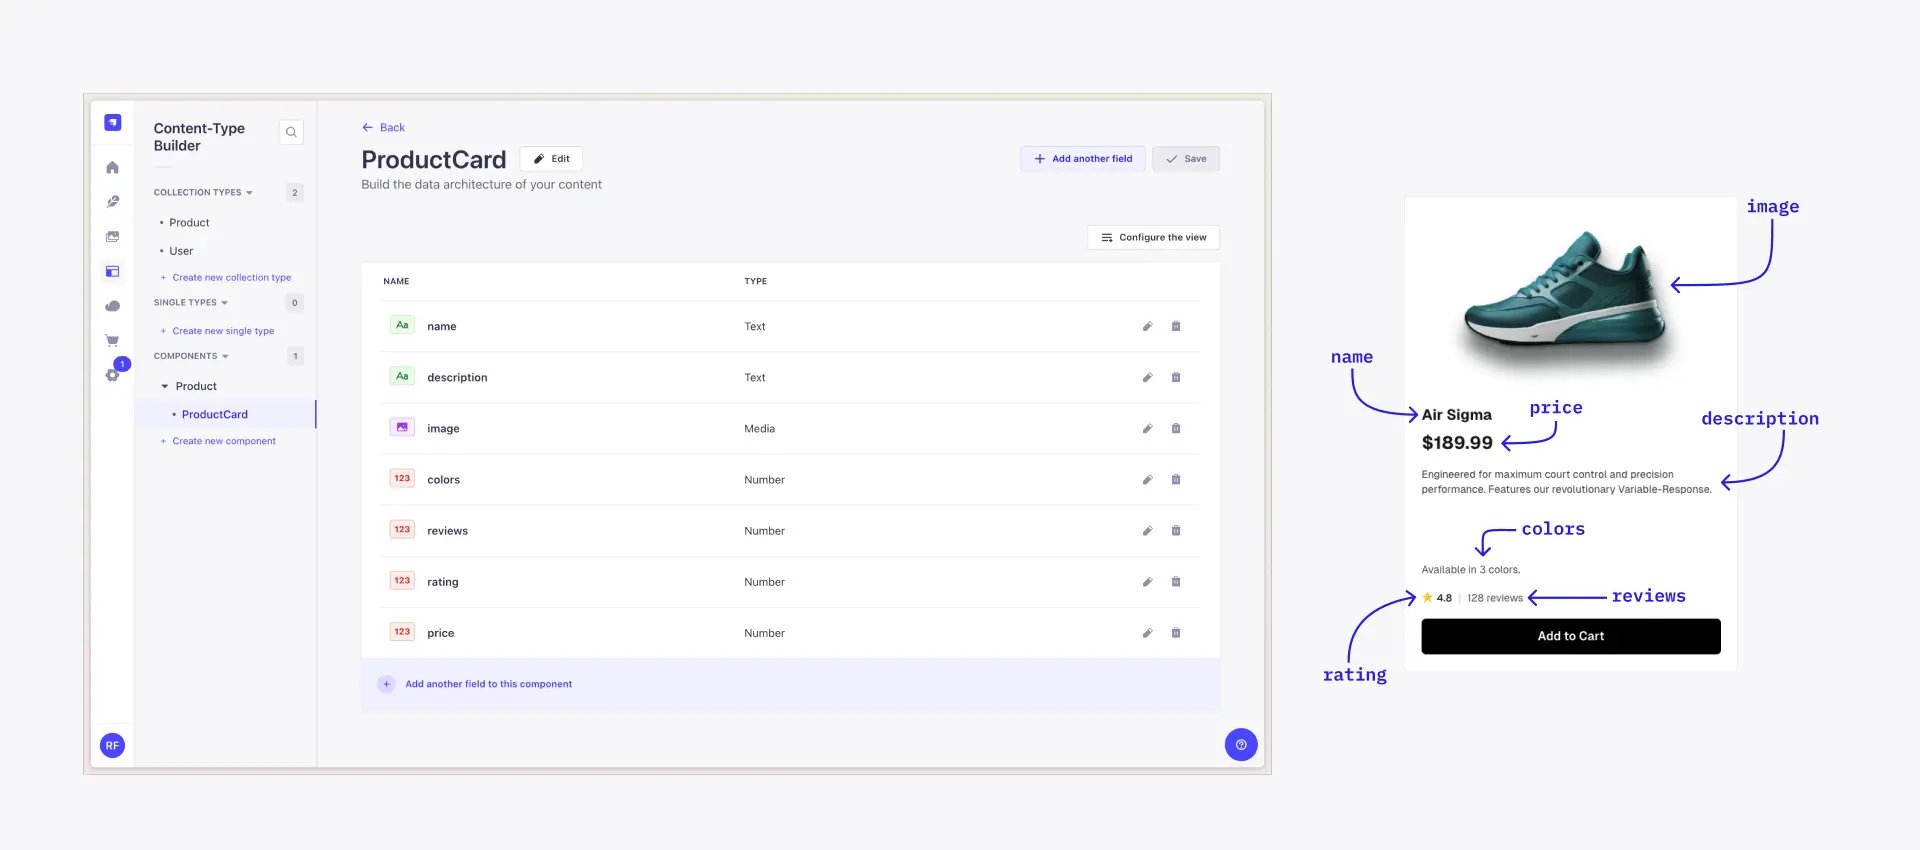
First, let's create a Product Card component for the Dynamic Zone. In the **Content-Type Builder**, go to **Components** and create a new component called `productCard`. The fields for this component are up to you, but here's an example:

* name
* description
* image
* colors
* reviews
* rating
* price

In our frontend, we use these fields to render the Product Card component.

The image below shoes the `productCard` component in Strapi and how it's rendered in the frontend.

<Frame>
  <img src="https://mintcdn.com/growthbook-ea15456d/4KUzUtpaNUGa50Xc/static/images/guides/strapi-product-card.webp?fit=max&auto=format&n=4KUzUtpaNUGa50Xc&q=85&s=8f010615d3dac2777d5fb6cbd1e29594" alt="Strapi Product Card" width="1920" height="850" data-path="static/images/guides/strapi-product-card.webp" />
</Frame>

### Product Collection

Next, create a new collection called **Product**. Add a Dynamic Zone field called `products` that uses the `productCard` component.

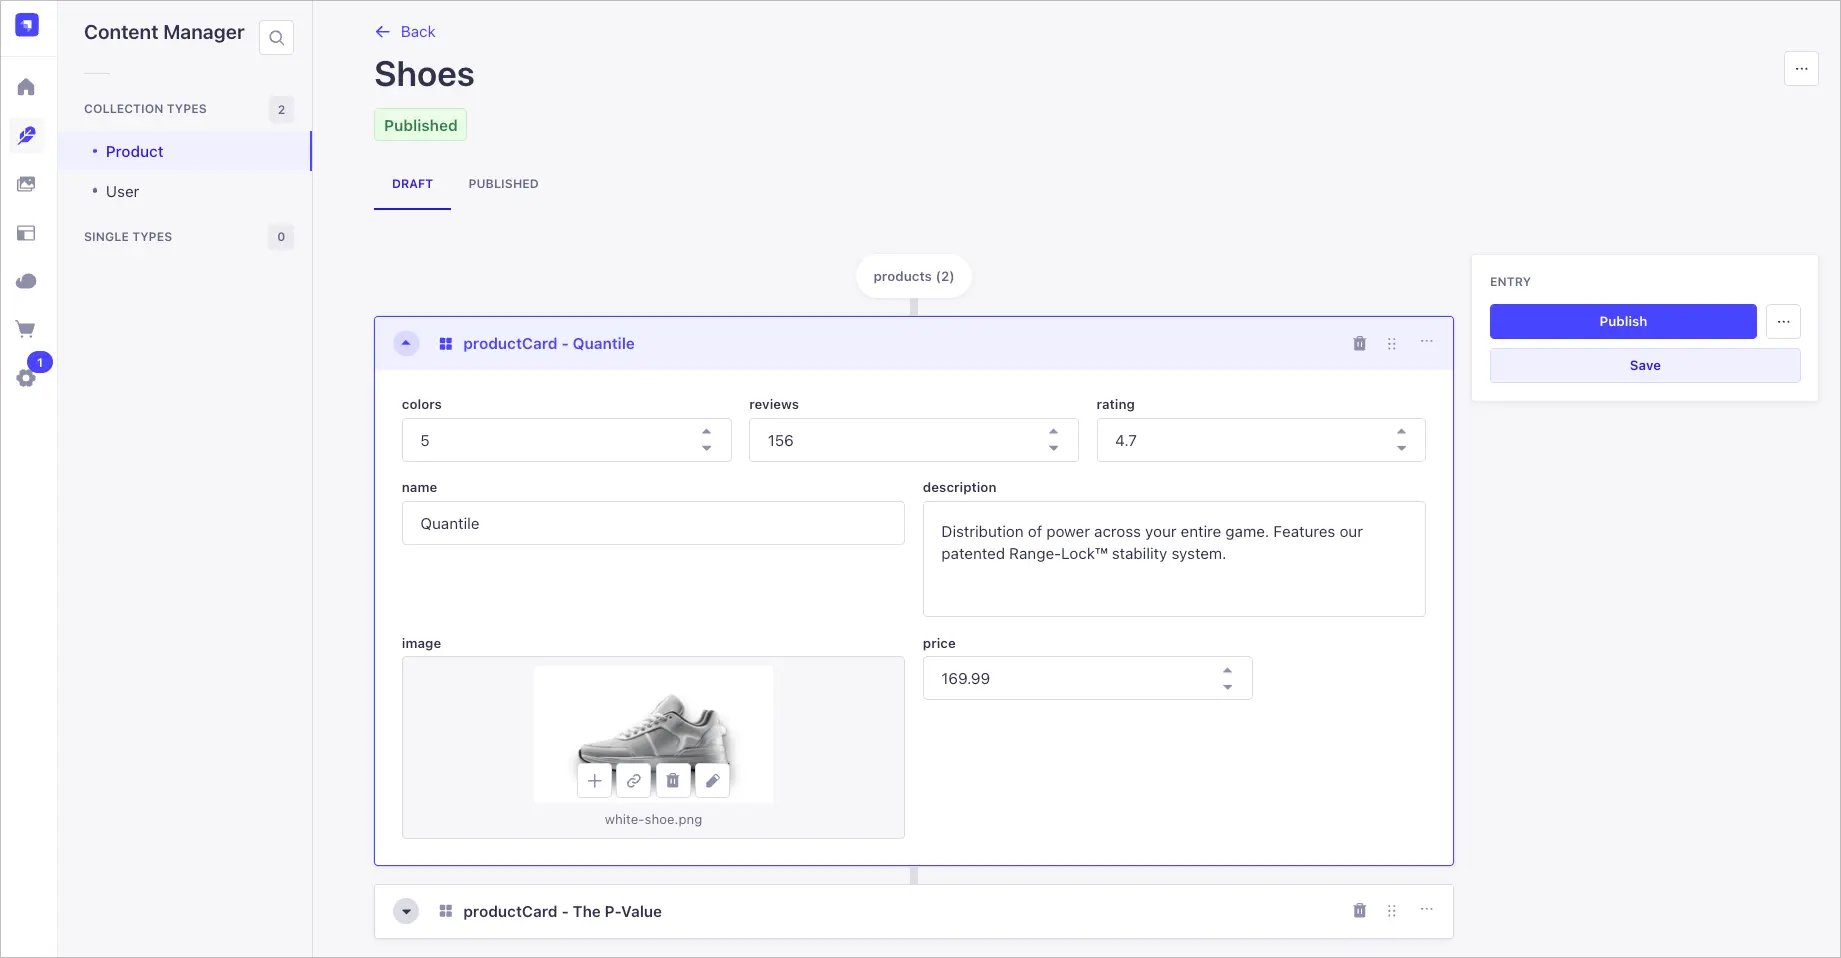
We'll create a **Shoes** product collection with 2 `productCard` components that we'll test against each other:

* Control: Quantile running shoe
* Variation: P-Value training shoe

<Frame>
  <img src="https://mintcdn.com/growthbook-ea15456d/4KUzUtpaNUGa50Xc/static/images/guides/strapi-shoes-collection.webp?fit=max&auto=format&n=4KUzUtpaNUGa50Xc&q=85&s=056257c04cca51a0ef99ef955c6d6dea" alt="Strapi Product Collection" width="1841" height="958" data-path="static/images/guides/strapi-shoes-collection.webp" />
</Frame>

## Create Feature Flags and A/B Tests in GrowthBook

The next step is to create a feature flag in GrowthBook. With feature flags, we can toggle content on and off, implement advanced targeting, and use the flags to run A/B tests. In this example, we'll set up a feature flag for the **Product** collection we just created in Strapi.

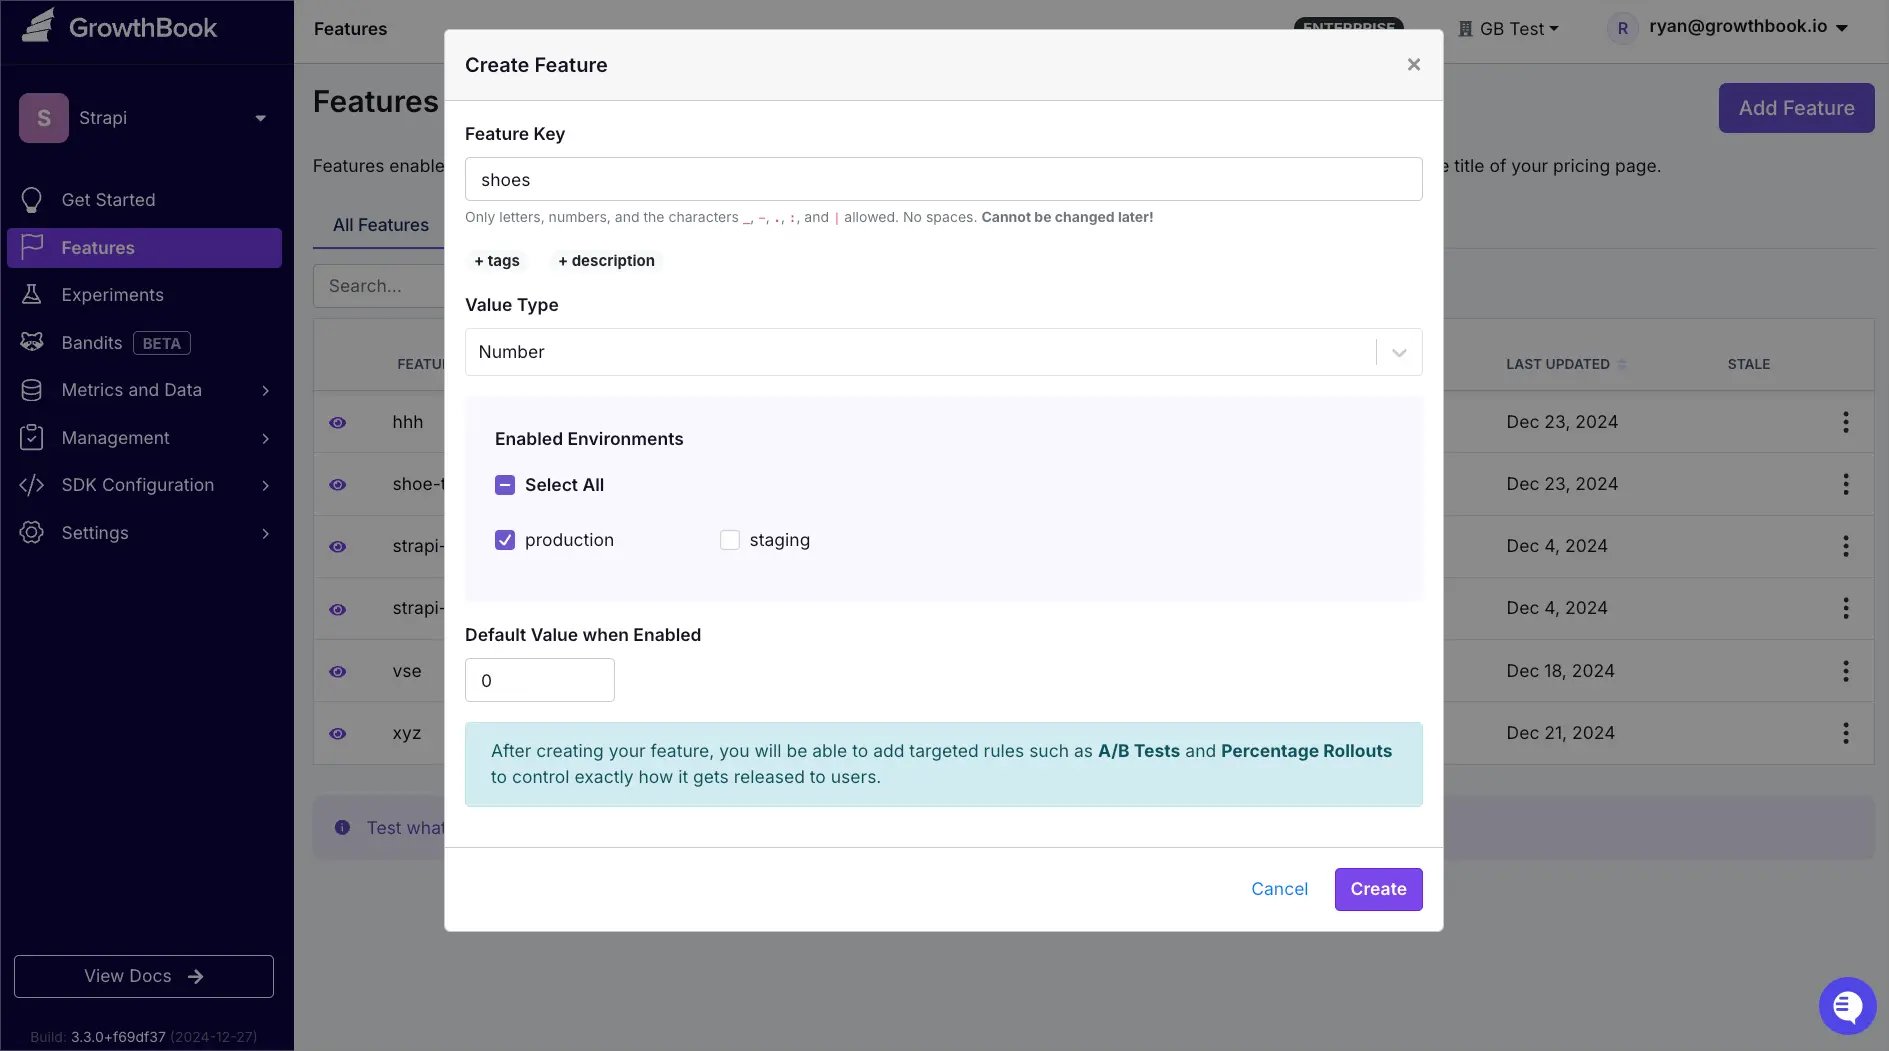
* Go to **Features** and click **Add Feature**.
* Add `shoes` as the **Feature Key**. (This key is used to reference the feature flag in your frontend.)
* Select **Number** as the value type. Set the **Default Value** to `0`.
* Click **Create**.

<Frame>
  <img src="https://mintcdn.com/growthbook-ea15456d/4KUzUtpaNUGa50Xc/static/images/guides/strapi-feature-flag.webp?fit=max&auto=format&n=4KUzUtpaNUGa50Xc&q=85&s=cb8bc4865f26013e2d7d1909170b4677" alt="Creating a feature flag in GrowthBook" width="1889" height="1051" data-path="static/images/guides/strapi-feature-flag.webp" />
</Frame>

### Create the A/B Test

The feature flag we created in the previous step allows us to easily create an A/B test.

* Go to the **shoes** feature flag.
* Scroll down to **Rules** and click **Add Rule**.
* Select **Experiment** and click **Next**.
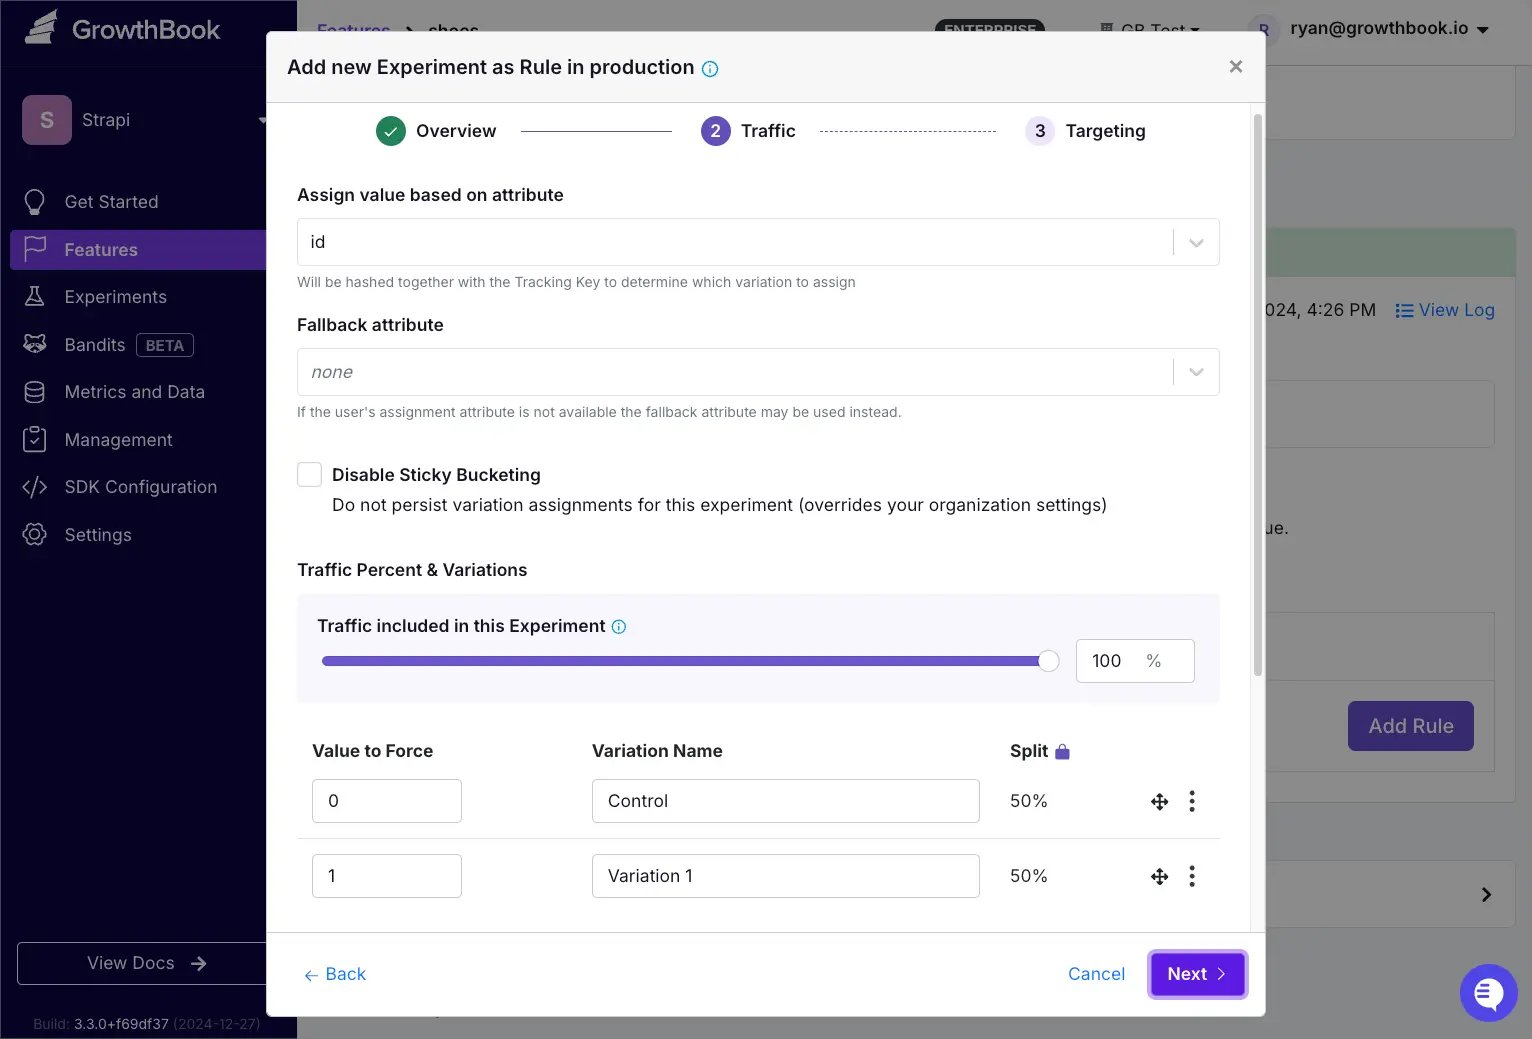
* Add an experiment name, which can be whatever you want. Other fields are optional.
* Click **Next**.

<Frame>
  <img src="https://mintcdn.com/growthbook-ea15456d/4KUzUtpaNUGa50Xc/static/images/guides/strapi-growthbook-experiment.webp?fit=max&auto=format&n=4KUzUtpaNUGa50Xc&q=85&s=bcbaa81726b5a22c11840d688f5e1df2" alt="Creating an experiment in GrowthBook" width="1532" height="1039" data-path="static/images/guides/strapi-growthbook-experiment.webp" />
</Frame>

In this example, we'll test 2 variations, but you can add as many as you like.

Click **Save → Review and Publish** when you're done.

The experiment is now live and ready to be integrated in your frontend.

<Info>
  **Zero-based index**

  The value of the feature flag directly maps to the object's zero-based index in your Dynamic Zone. For example, if the feature flag value is `0`, then the first `productCard` is served. If the value is `1`, then the second variation is served and so on.
</Info>

## Integrate Strapi and GrowthBook in Next.js

So far, we've set up Strapi and GrowthBook separately. Now, it's time to bring them together in our Next.js frontend. Make sure you've already configured your Next.js app to fetch content from Strapi and integrated with GrowthBook (see the [guides for each integration above](#prerequisites)).

This section walks through how to dynamically serve content based on the A/B experiment created in GrowthBook.

### Create a Helper Function

This helper function takes in your Strapi content and returns the correct variation based on GrowthBook's feature flag value, which, in our case, is the result of the A/B test. If the feature flag is toggled off, the function returns `null`.

The function takes in 3 parameters:

1. `gb`: Your GrowthBook instance (created as part of your GrowthBook integration into Next.js).
2. `variations`: The content variations fetched from Strapi.
3. `featureFlagKey`: The feature flag key from GrowthBook that [we created above](#create-feature-flags-and-ab-tests-in-growthbook).

In your Next.js app, add the following code:

```tsx theme={null}
import { type GrowthBook } from "@growthbook/growthbook";

type Props<T> = {
  gb: GrowthBook;
  variations: T[] | null;
  featureFlagKey: string;
};

export default function getVariation<T>({
  gb,
  variations,
  featureFlagKey,
}: Props<T>): T | null {
  // Evaluate the featue flag
  const result = gb.getFeatureValue<number | null>(featureFlagKey, null);

  // If the feature flag is off or variations are empty, return null
  if (!variations || result === null) {
    return null;
  }

  // Return the variation based on the feature flag value
  return variations?.[result] ?? null;
}
```

### Update page.tsx

The last part of the process is to update a component to use the variation returned by the `getVariationHelper`.

```tsx theme={null}
export default async function Home() {
  // Get the variation for the "shoes" feature flag
  const variation = getVariation<Card>({
    gb,
    variations: shoesToTest,
    featureFlagKey: "shoes",
  });

  return (
    <div className="min-h-screen p-8 font-[family-name:var(--font-geist-sans)] flex items-center justify-center">
      <main className="flex gap-12 items-center border p-8 py-8 rounded-md w-full">
        <div className="grid grid-cols-1 md:grid-cols-2 lg:grid-cols-3 gap-6 p-6">
          {/* A default collection of items to always show */}
          {defaultShoes.map((product: Card) => (
            <ProductCard key={product.name} product={product} />
          ))}
          {/* A single product, dynamically shown based on the A/B test */}
          <ProductCard product={variation} />
        </div>
      </main>
      <GrowthBookTracking data={trackingData} />
    </div>
);
}
```

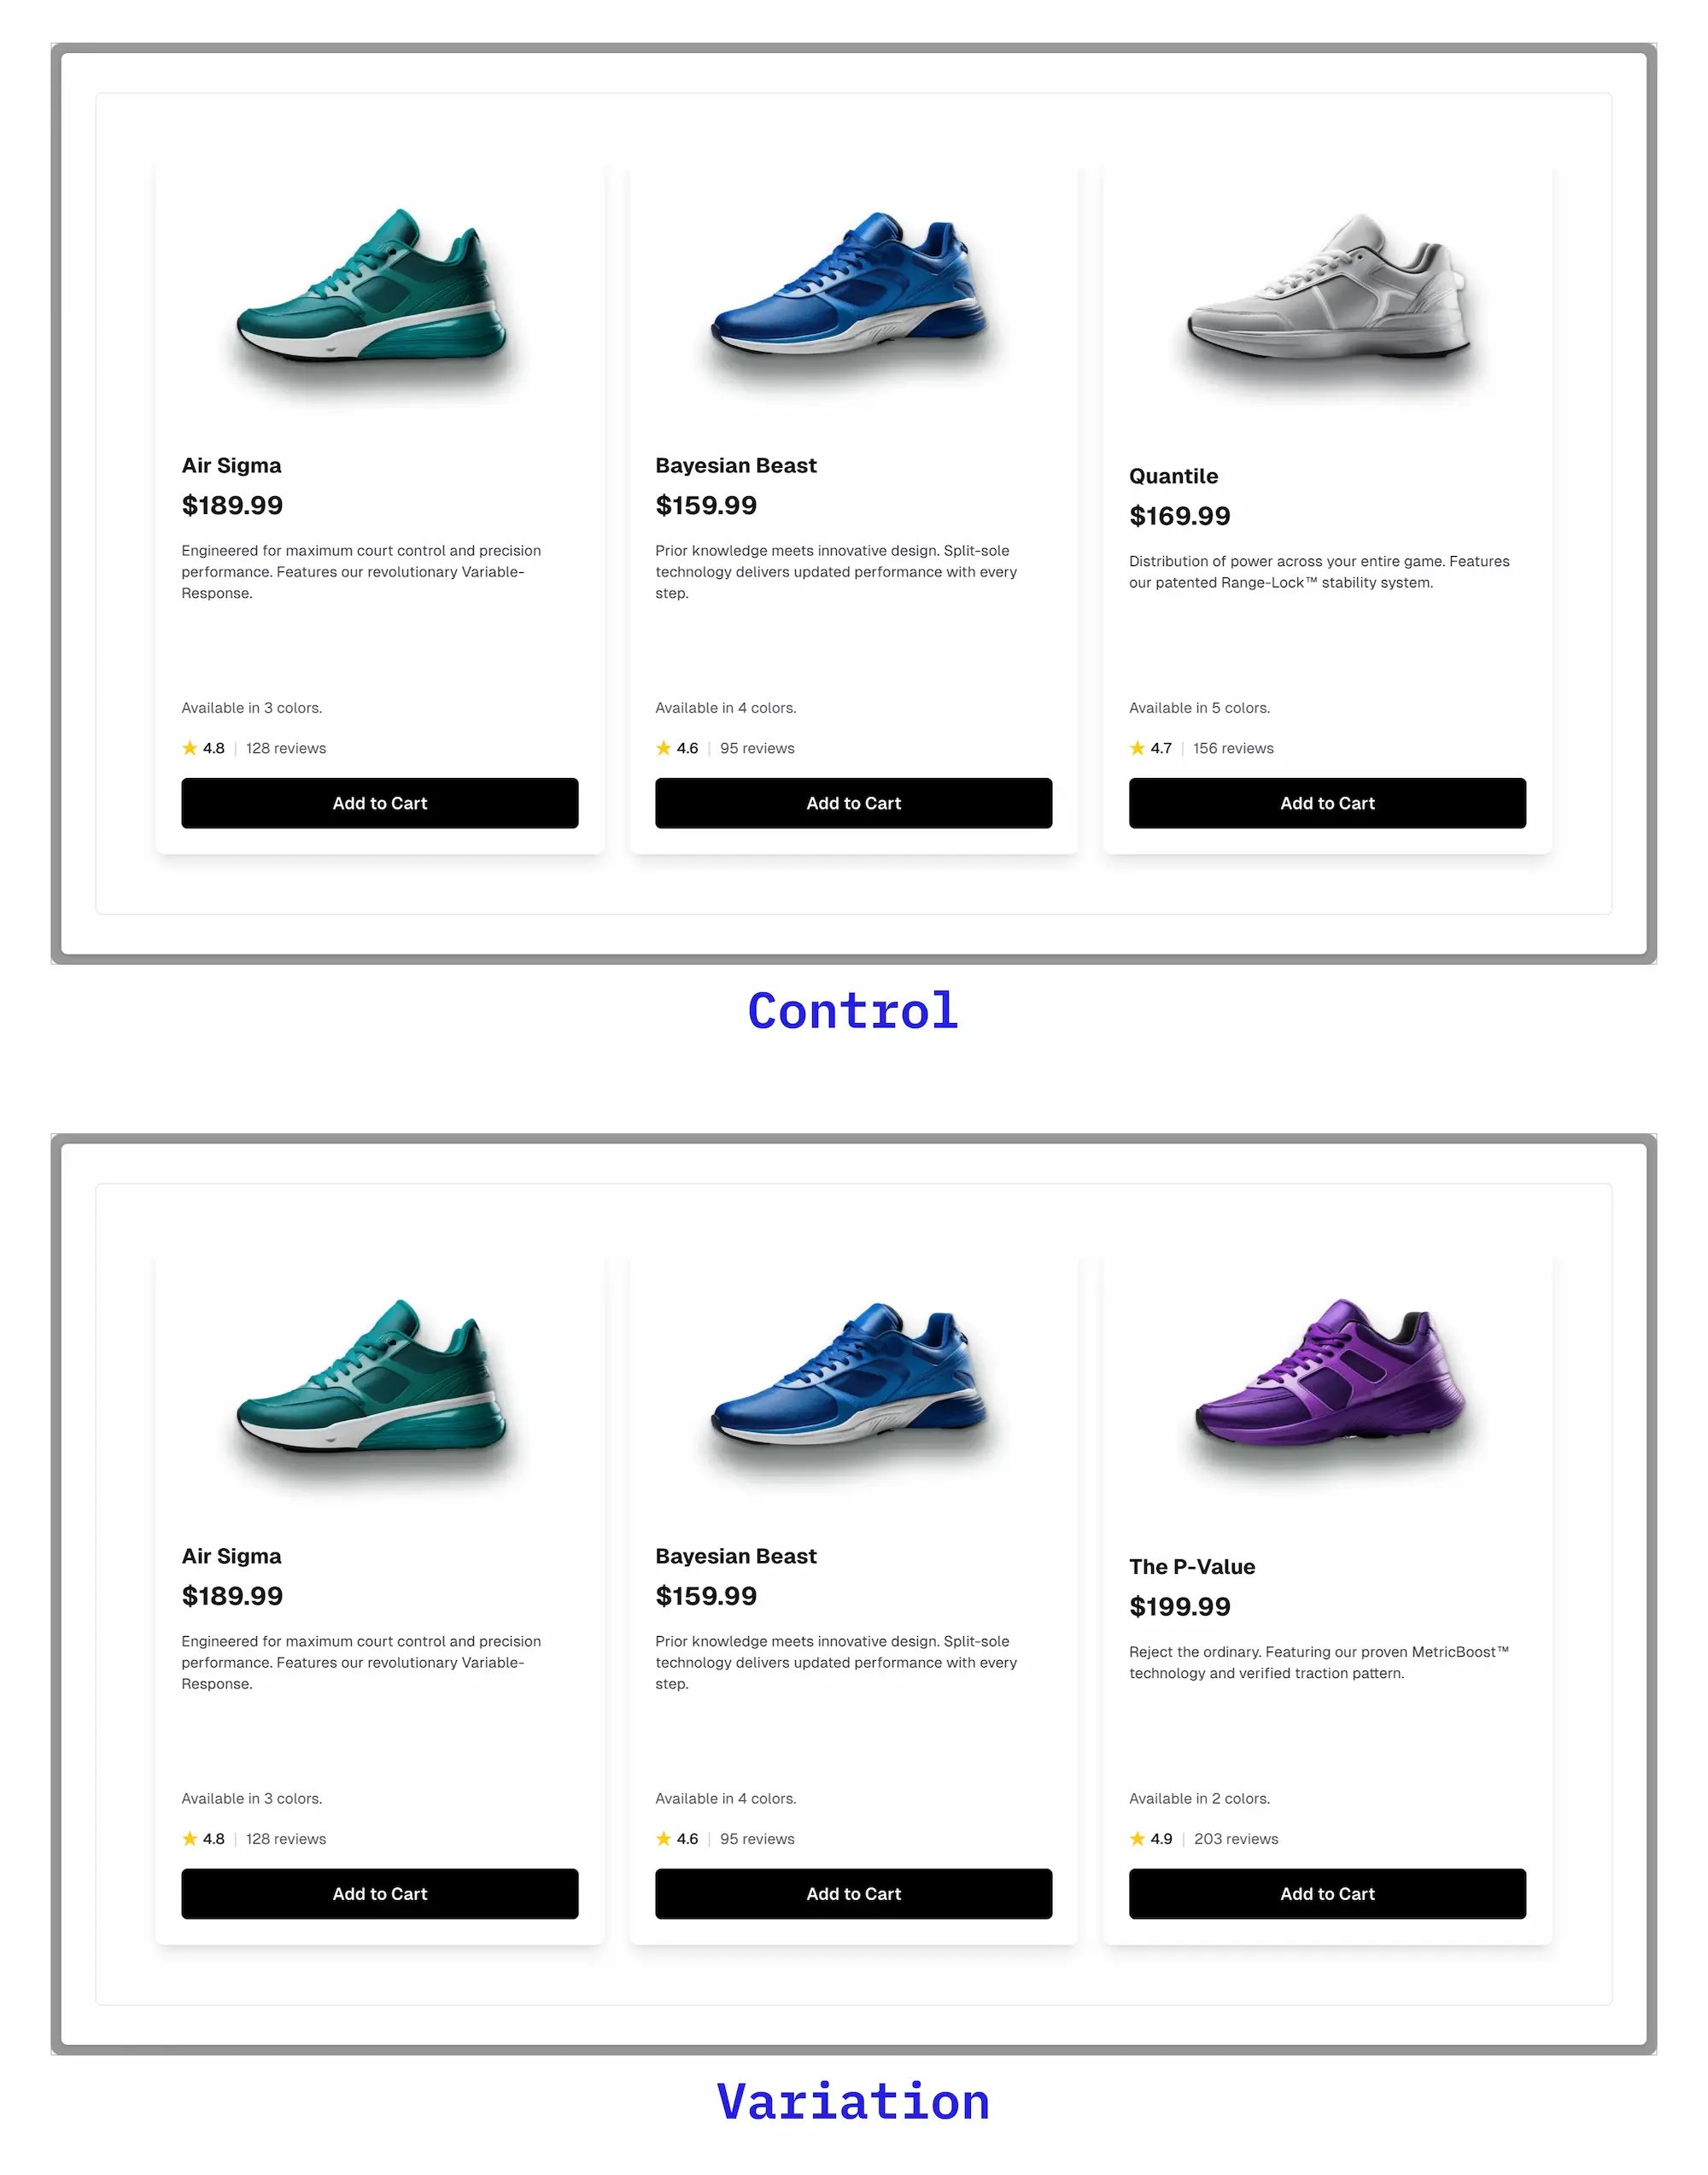
Now, the app renders a different product card based on the A/B test result. The control shows the Quantile shoe, and the variation shows the P-Value.

<Frame>
  <img src="https://mintcdn.com/growthbook-ea15456d/4KUzUtpaNUGa50Xc/static/images/guides/strapi-control-vs-variation.webp?fit=max&auto=format&n=4KUzUtpaNUGa50Xc&q=85&s=42b0b6111ae38dcfaaab27b27e12989f" alt="Control vs Variation product cards in Strapi, GrowthBook, and Next.js" width="2000" height="2547" data-path="static/images/guides/strapi-control-vs-variation.webp" />
</Frame>

<Tip>
  **Tracking metrics**

  To measure the success of your experiments, make sure to track relevant metrics (like clicks or conversions) using your analytics platform. See our guide on [setting up analytics with GrowthBook](/app/datasources).
</Tip>

## Summary

In this tutorial, you built a complete A/B testing system that combines the power of Strapi's content management with GrowthBook's experimentation capabilities 🎉

Here's a recap of what you learned:

* Structure content in Strapi for A/B testing using Dynamic Zones
* Create and configure feature flags in GrowthBook
* Build a helper function to dynamically serve content variations
* Integrate everything in a Next.js frontend

Now you can launch and iterate on content experiments directly from your CMS, without needing developer help for each test!

## Next Steps

Ready to take your experimentation system further? Here are some ways to build upon what you learned:

* [Integrate with analytics platforms](/app/datasources) like Google Analytics or Segment.
* [Set up advanced targeting](/features/targeting) for your experiments and feature flags.

## Resources

* [Strapi Documentation](https://docs.strapi.io/)
* [GrowthBook Documentation](/)
* [Next.js Documentation](https://nextjs.org/docs)
* [GrowthBook Next.js Examples](https://github.com/growthbook/examples/tree/main/next-js)
* [LaunchPad: Strapi Next.js Integration Example](https://github.com/strapi/LaunchPad)

## Troubleshooting

1. **Content not updating in frontend**
   * Check if content is published in Strapi
   * Verify the Dynamic Zone array indices match your feature flag values
   * Clear your browser cache and reload

2. **Feature flag not working**
   * Ensure the feature flag key matches exactly (e.g., "shoes")
   * Check if the experiment is running in GrowthBook
   * Verify your GrowthBook SDK connection

3. **Helper function returning null**
   * Confirm variations array is not empty
   * Check if feature flag is enabled in GrowthBook
   * Log the feature flag value to verify it's working