> ## Documentation Index
> Fetch the complete documentation index at: https://docs2.growthbook.io/llms.txt
> Use this file to discover all available pages before exploring further.
# Using GrowthBook with Google Tag Manager (GTM)
> This guide walks you through using GrowthBook with Google Tag Manager (GTM) to track your experiments and measure their impact on your business.
## Overview
This guide shows you how to integrate GrowthBook with Google Tag Manager (GTM) to run A/B tests and manage feature flags without having to directly modify your app's code.
This setup is ideal for:
* Marketing teams managing website experiments
* CRO agencies handling multiple client websites
* Teams without direct access to website code
### Prerequisites
Before starting, ensure you have:
* Access to your [Google Tag Manager account](https://tagmanager.google.com/)
* A [GrowthBook account](https://app.growthbook.io/)
* Basic familiarity with GTM's interface
## 1. Set Up GrowthBook SDK Connection
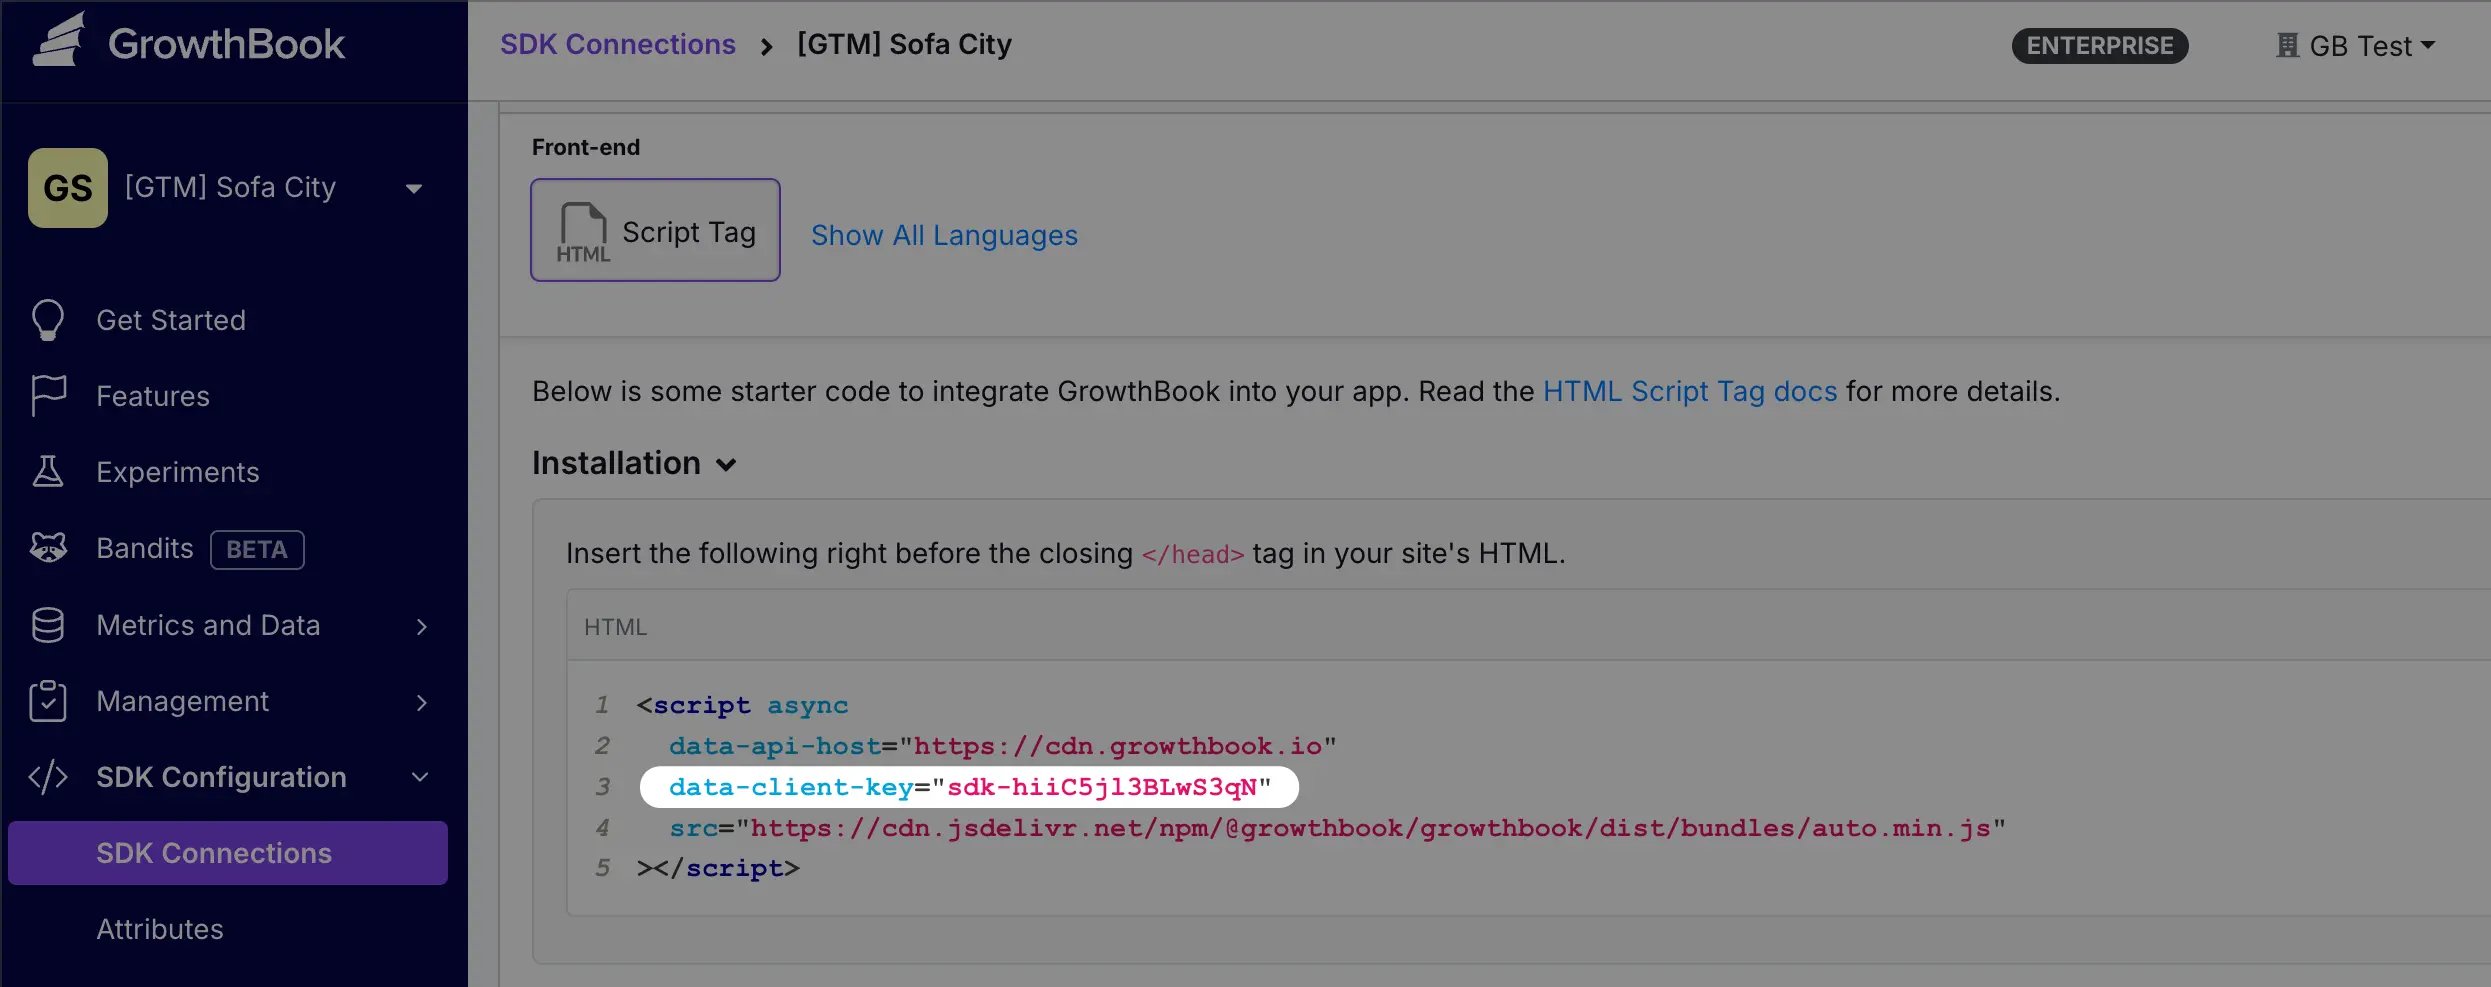
* In GrowthBook, navigate to **SDK Configuration** → **SDK Connections**
* Click **Add SDK Connection**
* Add a **Name**, choose **HTML Script Tag**, and click **Save**
* Copy the `data-client-key` value from the script tag. You'll need this for the next step
 ## 2. Create GTM Tag for GrowthBook
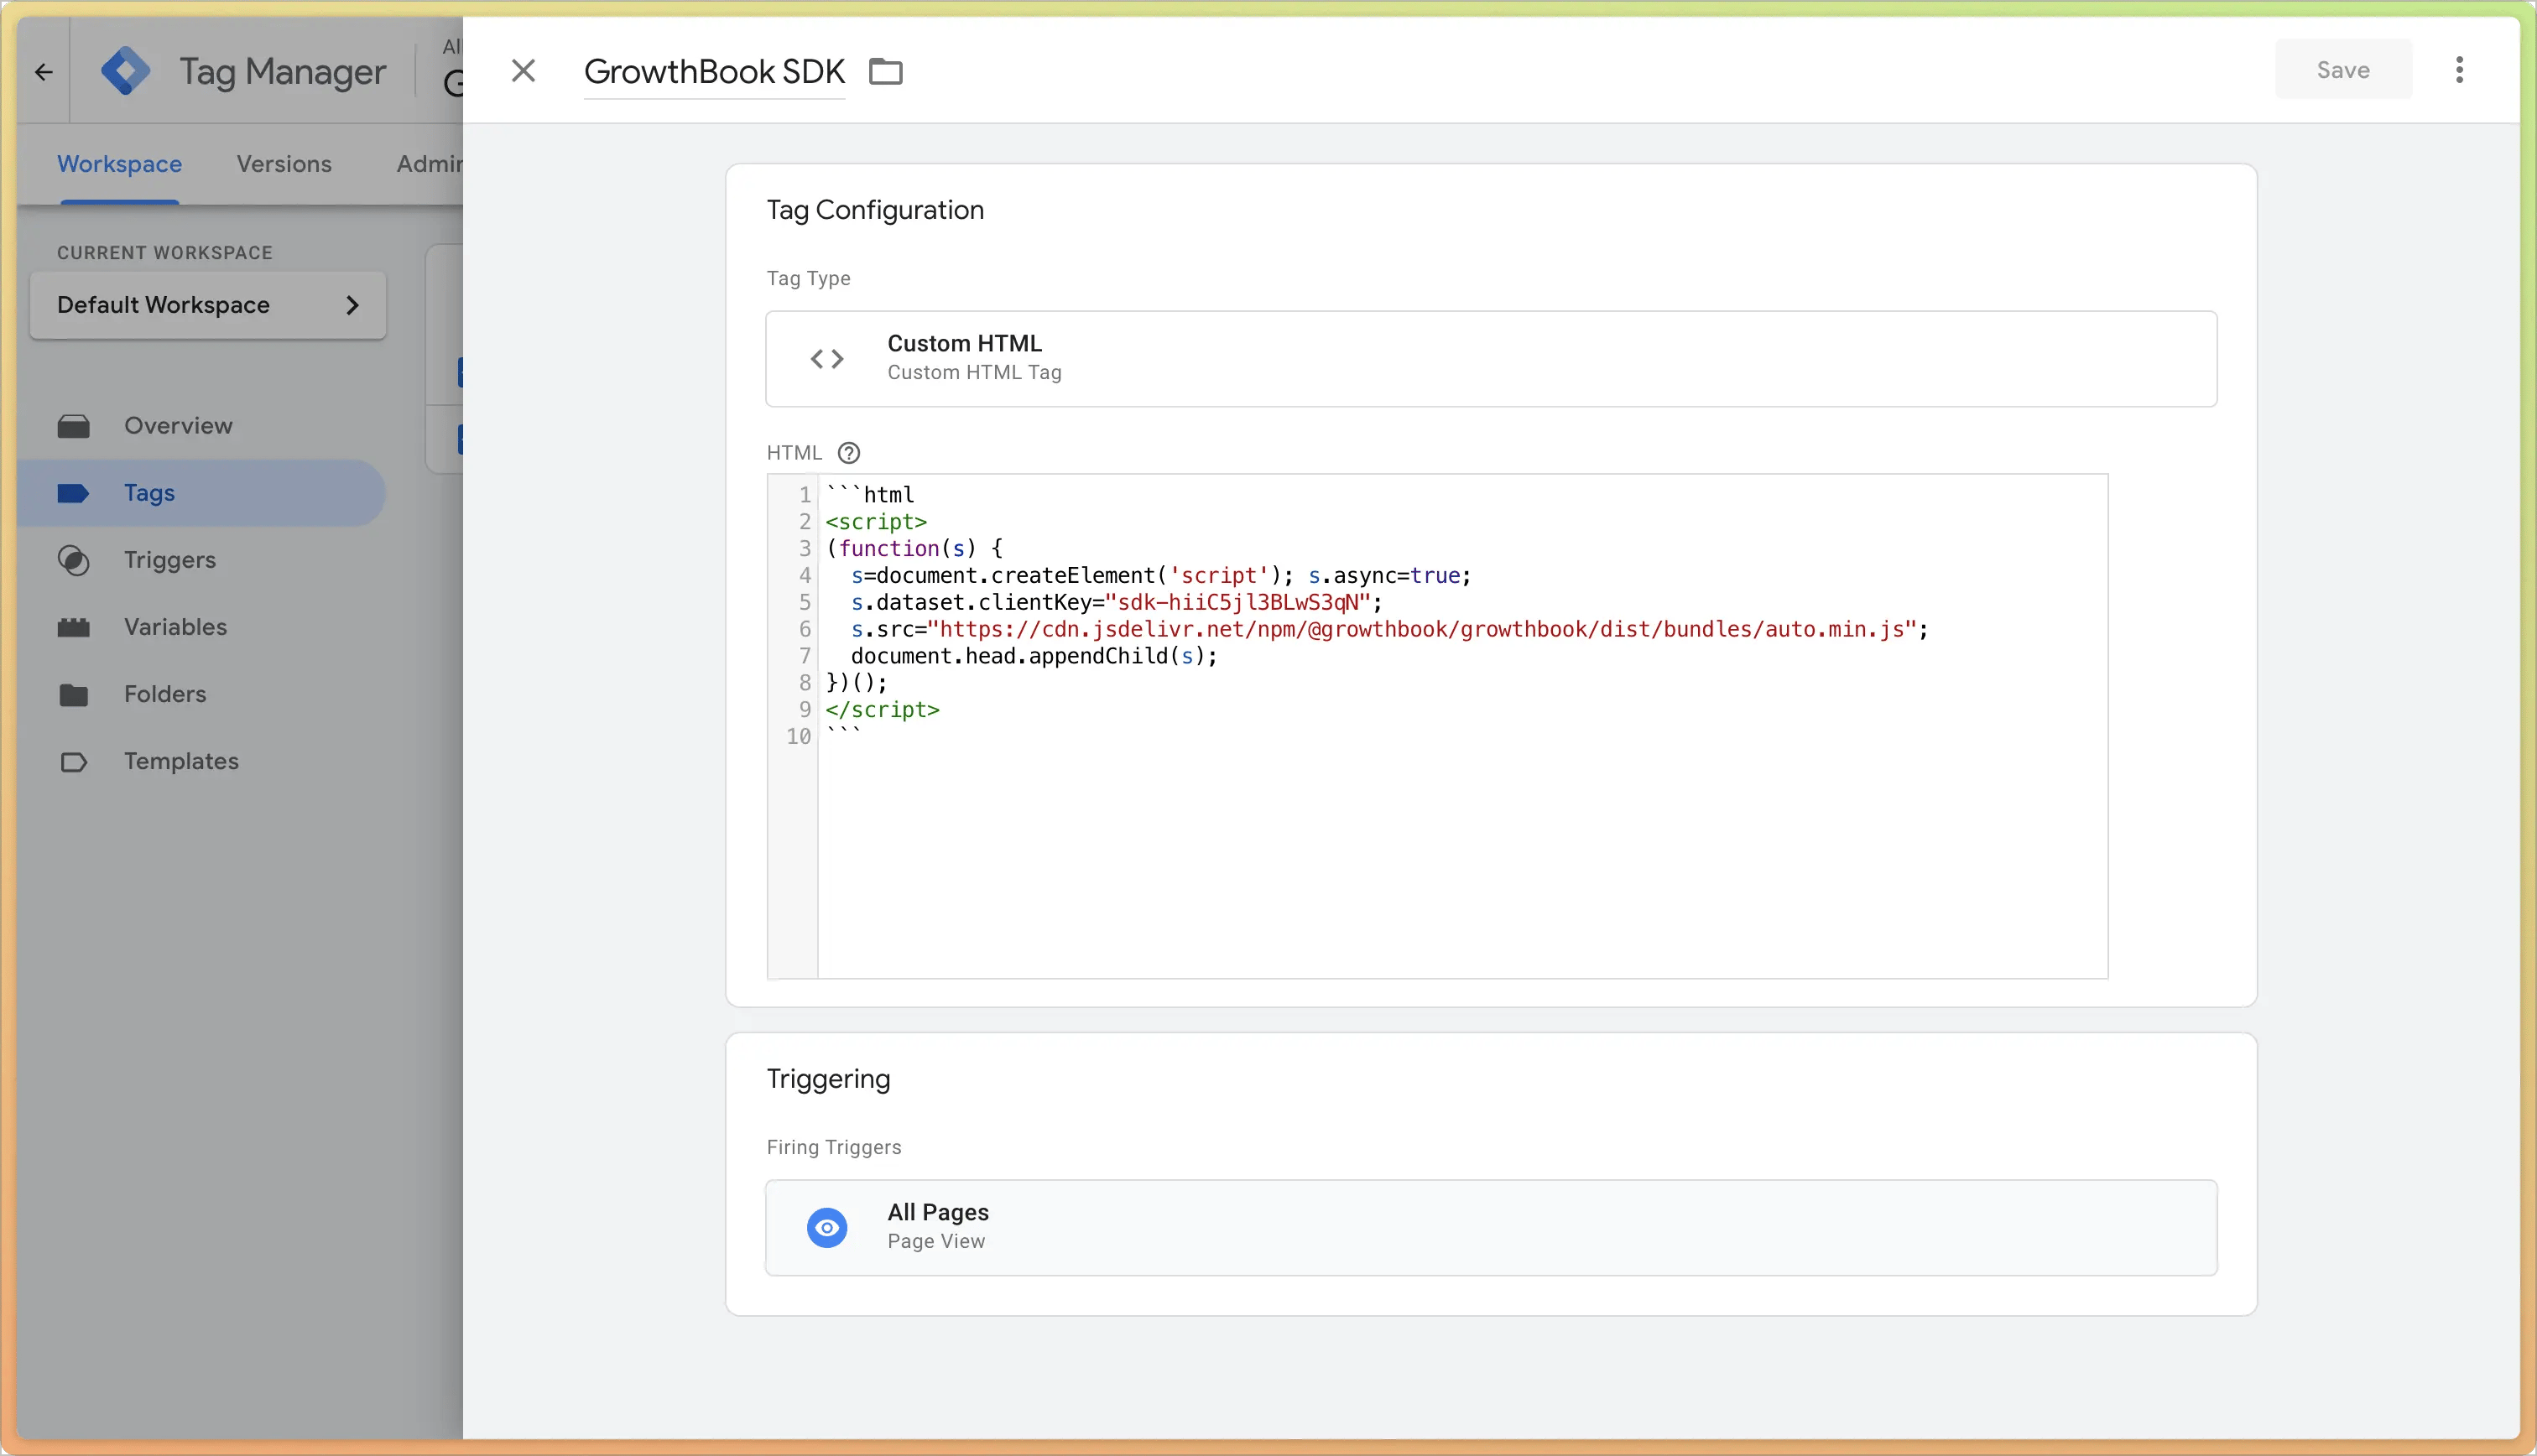
* Open your GTM workspace
* Click **Tags** in the left sidebar
* Click **New** to create a tag
* Click **Tag Configuration** and use **Custom HTML** as the tag type
* Paste the following script tag, replacing `YOUR_CLIENT_KEY_HERE` with the value from the previous step:
```html theme={null}
```
* Click **Triggering** and choose the pages where you want to run this tag. Use **All Pages** to load it everywhere
* Click **Save** and call your tag "GrowthBook SDK" or similar
## 2. Create GTM Tag for GrowthBook
* Open your GTM workspace
* Click **Tags** in the left sidebar
* Click **New** to create a tag
* Click **Tag Configuration** and use **Custom HTML** as the tag type
* Paste the following script tag, replacing `YOUR_CLIENT_KEY_HERE` with the value from the previous step:
```html theme={null}
```
* Click **Triggering** and choose the pages where you want to run this tag. Use **All Pages** to load it everywhere
* Click **Save** and call your tag "GrowthBook SDK" or similar
 Be sure to click **Submit** and **Publish** to make your changes live. GrowthBook is now connected to your website via GTM 🤝
## 3. Use Feature Flags and A/B Experiments
It's possible to use GrowthBook in your GTM setup. This allows you to control feature flags and experiments without needing to modify your website code.
If you're planning to use the [Visual Editor](/app/visual), [URL redirects](/app/url-redirects), or to [run experiments in code](/feature-flag-experiments), skip ahead to the next section ⏭️
Create a new boolean feature flag with an A/B test. For this tutorial, we'll use a feature flag called `show-discount` to run an A/B test to show and hide an item's discount. New to feature flags in GrowthBook? Learn more about [creating them and A/B tests](/features/basics).
Next, we'll use GTM to apply the feature flag to your website:
* Create another Custom HTML tag in your workspace
* Set the firing trigger to the pages you want to run this on
* Use the following code as a starting point:
```html theme={null}
```
In this example, we're using the `show-discount` feature flag to run an A/B experiment. When the experiment evaluates to `true`, we add a CSS class to the price element on the page.
As seen in the image below, the control element shows the price, while the variation shows the original price with a strikethough and the discounted price in red. We can run this entire experiment straight from GTM, without needing to touch the website code!
Be sure to click **Submit** and **Publish** to make your changes live. GrowthBook is now connected to your website via GTM 🤝
## 3. Use Feature Flags and A/B Experiments
It's possible to use GrowthBook in your GTM setup. This allows you to control feature flags and experiments without needing to modify your website code.
If you're planning to use the [Visual Editor](/app/visual), [URL redirects](/app/url-redirects), or to [run experiments in code](/feature-flag-experiments), skip ahead to the next section ⏭️
Create a new boolean feature flag with an A/B test. For this tutorial, we'll use a feature flag called `show-discount` to run an A/B test to show and hide an item's discount. New to feature flags in GrowthBook? Learn more about [creating them and A/B tests](/features/basics).
Next, we'll use GTM to apply the feature flag to your website:
* Create another Custom HTML tag in your workspace
* Set the firing trigger to the pages you want to run this on
* Use the following code as a starting point:
```html theme={null}
```
In this example, we're using the `show-discount` feature flag to run an A/B experiment. When the experiment evaluates to `true`, we add a CSS class to the price element on the page.
As seen in the image below, the control element shows the price, while the variation shows the original price with a strikethough and the discounted price in red. We can run this entire experiment straight from GTM, without needing to touch the website code!
 ## 4. Tracking via DataLayer and GTM
To track experiment views, we use the `dataLayer` to capture experiment data. Whenever an experiment is viewed, we send an event with data like this:
```json theme={null}
{
"event": "experiment_viewed",
"experiment_id": "...",
"variation_id": "..."
}
```
In this tutorial, we'll send this data to Google Analytics 4 (GA4), which allows you to analyze experiments and their impact on your business metrics in GrowthBook. (It's also possible to forward this event to your analytics tool of choice.)
You'll need to connect GrowthBook to BigQuery to analyze your experiment data. See our guide on [configuring GrowthBook with BigQuery](/guide/bigquery) for more information.
### Create DataLayer Variables
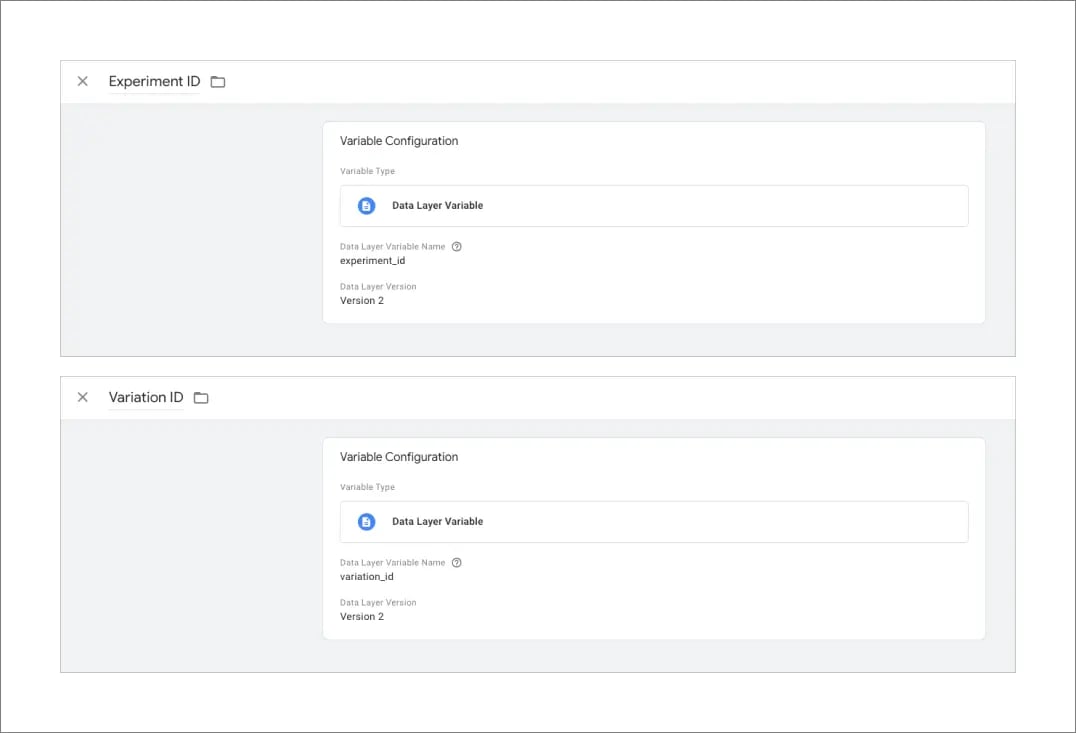
To capture experiment data from the `dataLayer`, create 2 new variables in GTM:
* Go to **Variables** in the left sidebar
* Click **New** under **User-Defined Variables**
* Create 2 variables:
* **Experiment ID**
* Click **Variable Configuration**
* Select **Data Layer Variable**
* Enter `experiment_id` as the **Data Layer Variable Name**
* Name the variable something descriptive like "Experiment ID"
* Click **Save**
* **Variation ID**
* Repeat the these steps but use `variation_id` as the **Data Layer Variable Name** and call it something like "Variation ID"
## 4. Tracking via DataLayer and GTM
To track experiment views, we use the `dataLayer` to capture experiment data. Whenever an experiment is viewed, we send an event with data like this:
```json theme={null}
{
"event": "experiment_viewed",
"experiment_id": "...",
"variation_id": "..."
}
```
In this tutorial, we'll send this data to Google Analytics 4 (GA4), which allows you to analyze experiments and their impact on your business metrics in GrowthBook. (It's also possible to forward this event to your analytics tool of choice.)
You'll need to connect GrowthBook to BigQuery to analyze your experiment data. See our guide on [configuring GrowthBook with BigQuery](/guide/bigquery) for more information.
### Create DataLayer Variables
To capture experiment data from the `dataLayer`, create 2 new variables in GTM:
* Go to **Variables** in the left sidebar
* Click **New** under **User-Defined Variables**
* Create 2 variables:
* **Experiment ID**
* Click **Variable Configuration**
* Select **Data Layer Variable**
* Enter `experiment_id` as the **Data Layer Variable Name**
* Name the variable something descriptive like "Experiment ID"
* Click **Save**
* **Variation ID**
* Repeat the these steps but use `variation_id` as the **Data Layer Variable Name** and call it something like "Variation ID"
 ### Create Custom Event Trigger
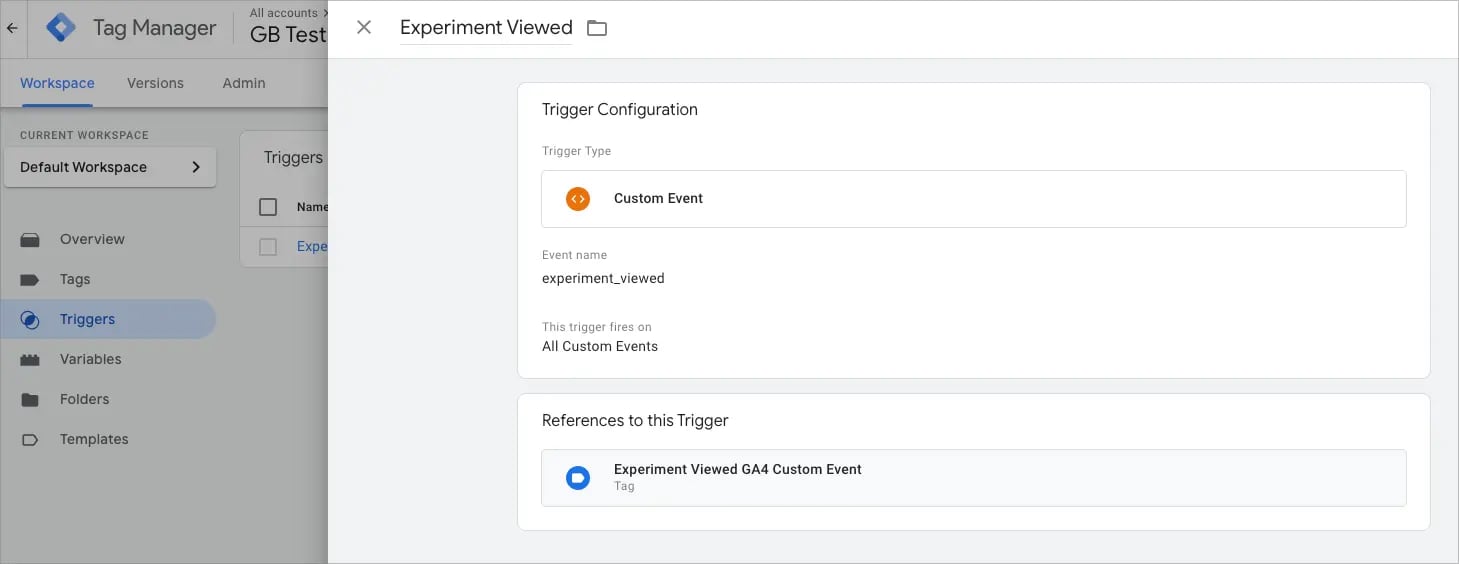
This custom trigger tells GTM when to fire the GA4 tag based on the `experiment_viewed` event.
* Go to **Triggers** in the left sidebar
* Click **New** and **Trigger Configuration**
* Choose **Custom Event** as the trigger type
* Name the trigger "Experiment Viewed Event" or similar
* Enter `experiment_viewed` as the **Event Name**
* Set the trigger to fire on **All Custom Events**
* Click **Save**
### Create Custom Event Trigger
This custom trigger tells GTM when to fire the GA4 tag based on the `experiment_viewed` event.
* Go to **Triggers** in the left sidebar
* Click **New** and **Trigger Configuration**
* Choose **Custom Event** as the trigger type
* Name the trigger "Experiment Viewed Event" or similar
* Enter `experiment_viewed` as the **Event Name**
* Set the trigger to fire on **All Custom Events**
* Click **Save**
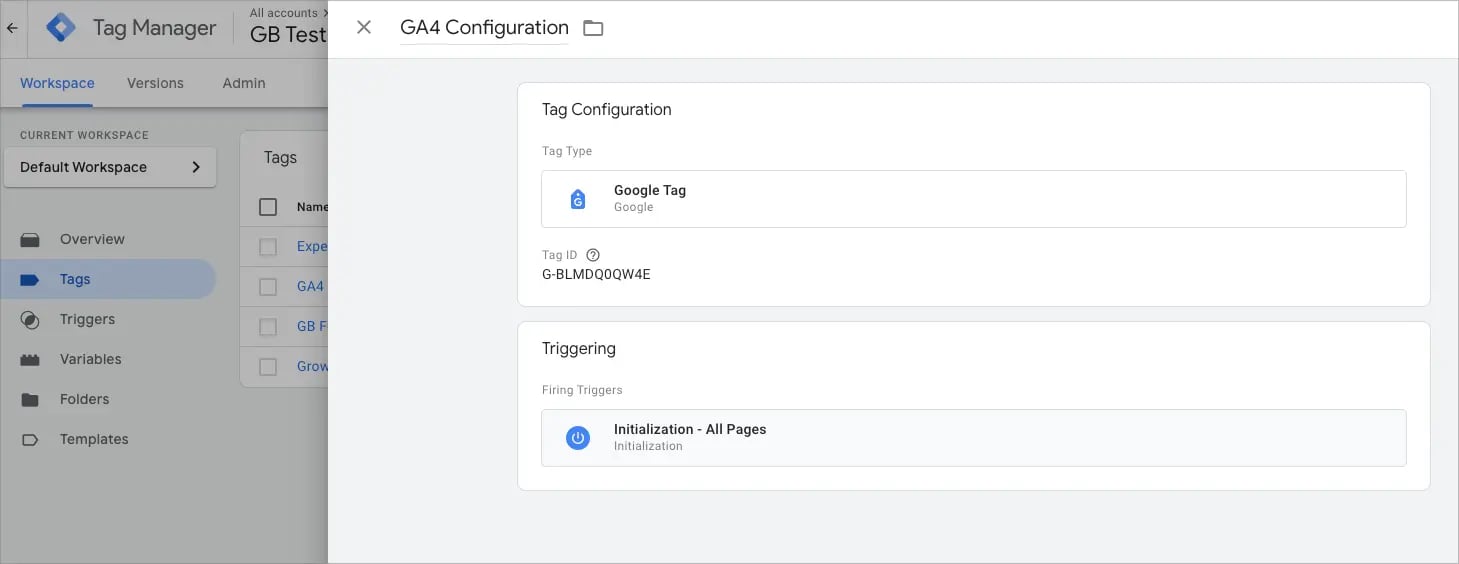
 ### Create GA4 Configuration Tag
Let's connect GTM to GA4. (Skip this step if you've already configured GA4 in your GTM container.)
* Create a new tag and select **Google Analytics** as the type
* Choose **Google Tag**
* Enter your [GA4 Measurement ID](https://support.google.com/analytics/answer/12270356?hl=en)
* Add **Initialization - All Pages** for the trigger
* Name the tag something like "GA4 Configuration" and save it
### Create GA4 Configuration Tag
Let's connect GTM to GA4. (Skip this step if you've already configured GA4 in your GTM container.)
* Create a new tag and select **Google Analytics** as the type
* Choose **Google Tag**
* Enter your [GA4 Measurement ID](https://support.google.com/analytics/answer/12270356?hl=en)
* Add **Initialization - All Pages** for the trigger
* Name the tag something like "GA4 Configuration" and save it
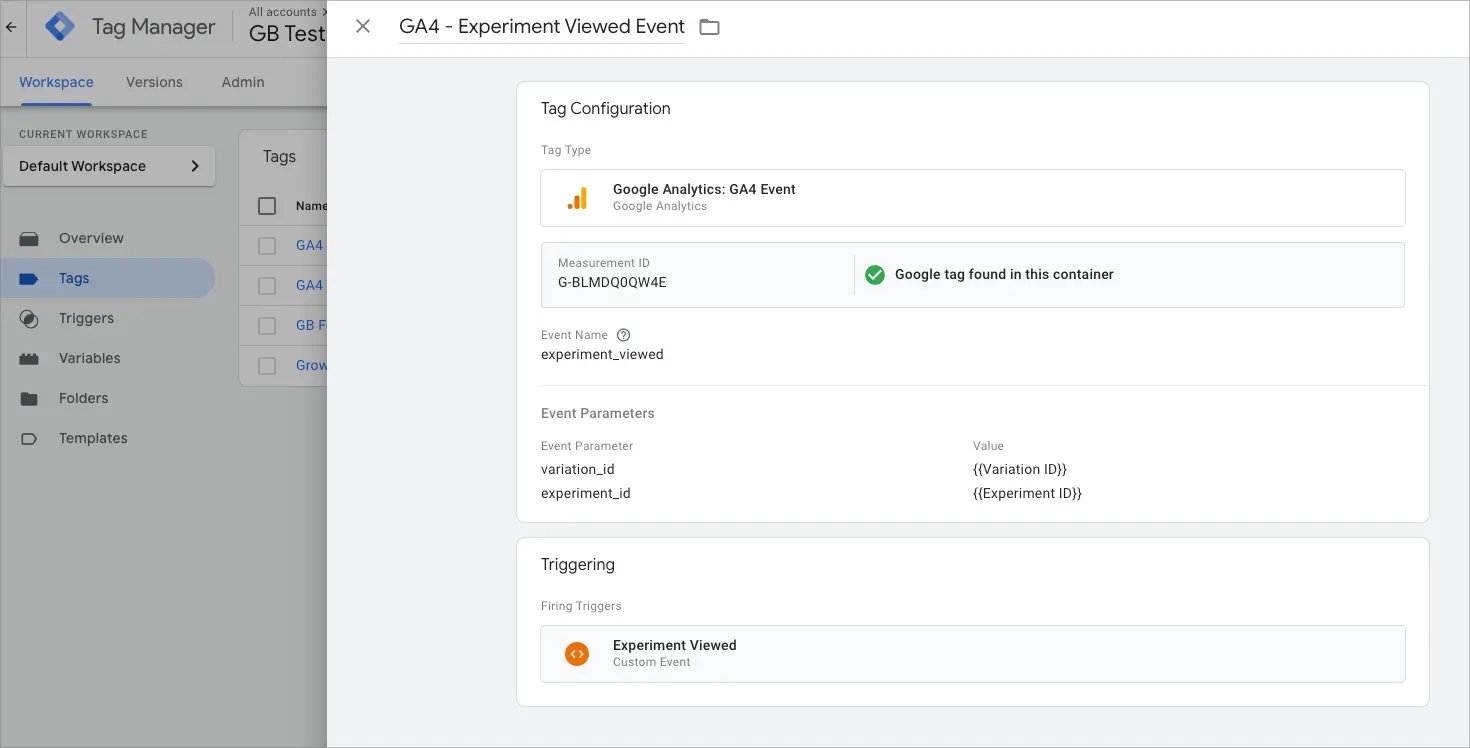
 ### Create GA4 Event Tag
Last step! Create a tag that sends the `experiment_viewed` event data to GA4.
* Create a new tag in GTM
* Select **Google Analytics: GA4 Event**
* Configuration:
* Measurement ID: Use your GA4 ID (or reference the GA4 Configuration tag)
* Event Name: `experiment_viewed`
* Event Parameters:
* Event Parameter: `experiment_id`
* Value: `{{Experiment ID}}`
* Event Parameter: `variation_id`
* Value: `{{Variation ID}}`
* Triggering: Select the **Experiment Viewed Event** trigger
* Name the tag (e.g., "GA4 - Experiment Viewed Event")
* Save the tag
### Create GA4 Event Tag
Last step! Create a tag that sends the `experiment_viewed` event data to GA4.
* Create a new tag in GTM
* Select **Google Analytics: GA4 Event**
* Configuration:
* Measurement ID: Use your GA4 ID (or reference the GA4 Configuration tag)
* Event Name: `experiment_viewed`
* Event Parameters:
* Event Parameter: `experiment_id`
* Value: `{{Experiment ID}}`
* Event Parameter: `variation_id`
* Value: `{{Variation ID}}`
* Triggering: Select the **Experiment Viewed Event** trigger
* Name the tag (e.g., "GA4 - Experiment Viewed Event")
* Save the tag
 ### Testing Your Setup
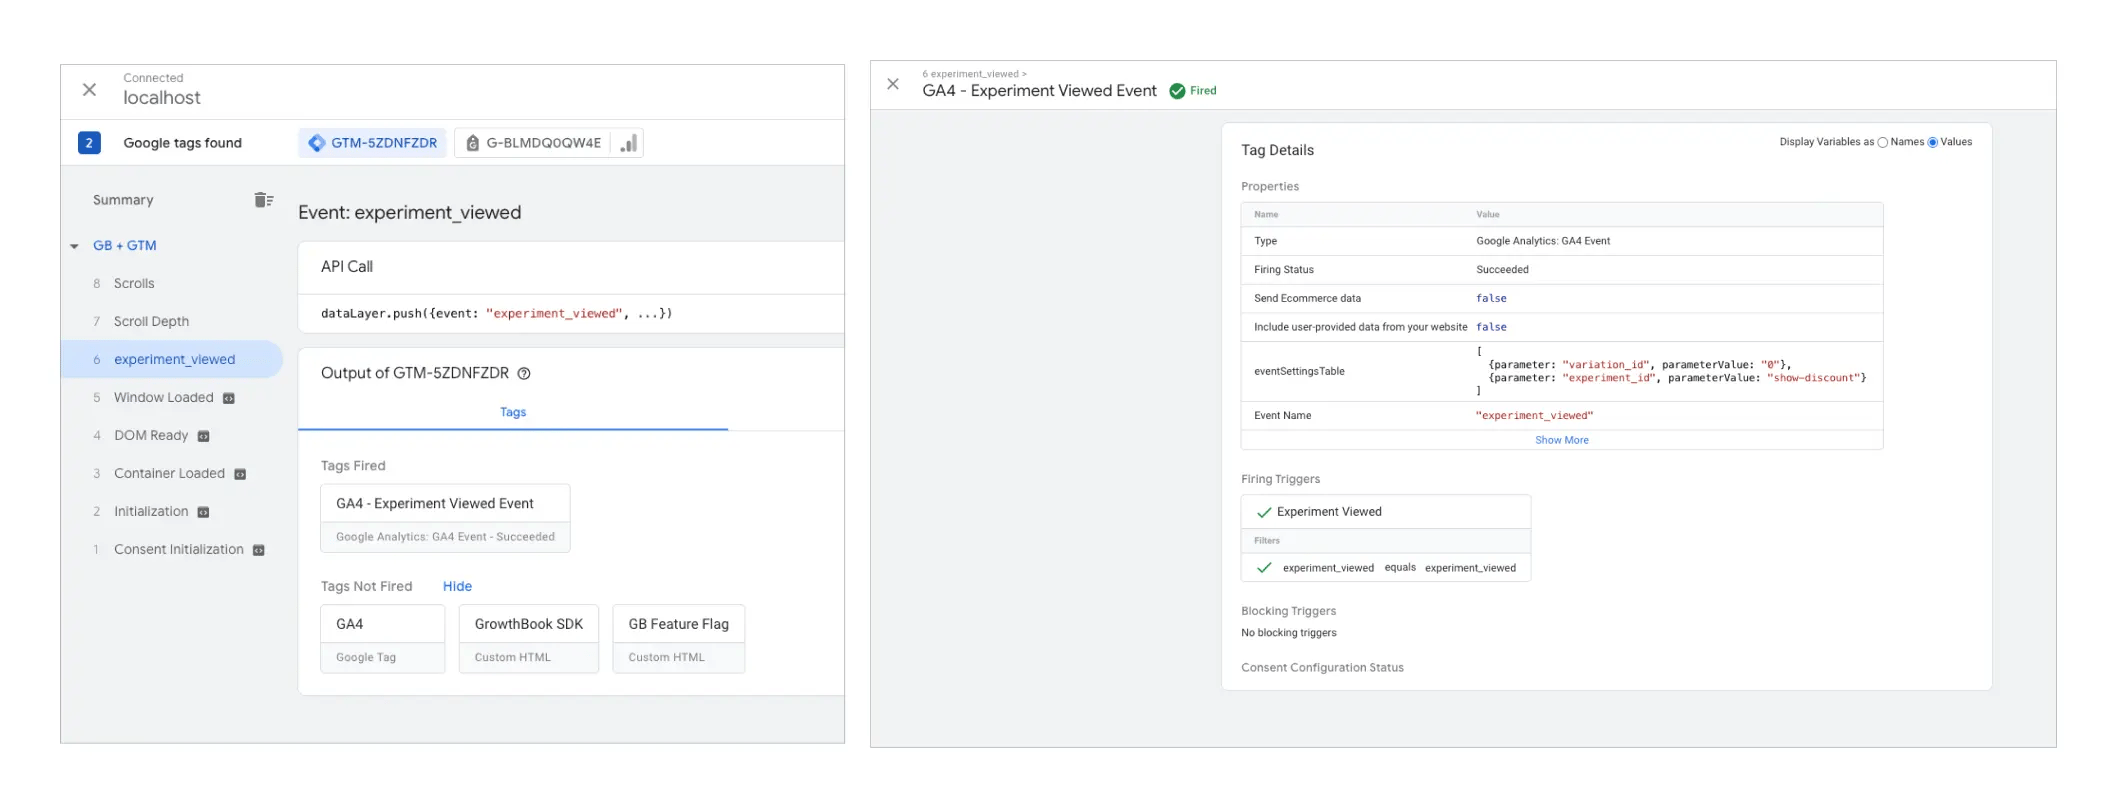
1. In GTM:
* Click **Preview** in the top right
* Enter your website URL
* Click **Start**
2. In Preview Mode:
* Look for the GrowthBook SDK tag firing
* Verify the `experiment_viewed` event appears
* Check that the event parameters contain the correct experiment and variation IDs
### Testing Your Setup
1. In GTM:
* Click **Preview** in the top right
* Enter your website URL
* Click **Start**
2. In Preview Mode:
* Look for the GrowthBook SDK tag firing
* Verify the `experiment_viewed` event appears
* Check that the event parameters contain the correct experiment and variation IDs
 3. In GA4 (may take 24-48 hours to appear):
* Go to Real-Time reports
* Look for the `experiment_viewed` event
* Verify the parameters are being received correctly
Remember to save and publish your changes in GTM once you're ready to go live. You can now track experiment views in GA4 using GTM.
## Conclusion
You've successfully integrated GrowthBook with Google Tag Manager to run A/B tests and manage feature flags on your website. This setup allows you to control experiments without needing to modify your website code directly ✊
### Next Steps
* Check out our guide for connecting [GrowthBook to GA4 and BigQuery](/guide/GA4-google-analytics)
* For other analytics tools, see our guide on [connecting to your data warehouse](/warehouses)
### Troubleshooting
Please see our [Google Tag Manager (GTM) Troubleshooting Guide](/kb/google-analytics/google-tag-manager-gtm-troubleshooting) and our [GA4 Troubleshooting Guide](/kb/google-analytics/google-analytics-ga4-troubleshooting) (if relevant) for help debugging GTM and GA4 integrations with GrowthBook.
3. In GA4 (may take 24-48 hours to appear):
* Go to Real-Time reports
* Look for the `experiment_viewed` event
* Verify the parameters are being received correctly
Remember to save and publish your changes in GTM once you're ready to go live. You can now track experiment views in GA4 using GTM.
## Conclusion
You've successfully integrated GrowthBook with Google Tag Manager to run A/B tests and manage feature flags on your website. This setup allows you to control experiments without needing to modify your website code directly ✊
### Next Steps
* Check out our guide for connecting [GrowthBook to GA4 and BigQuery](/guide/GA4-google-analytics)
* For other analytics tools, see our guide on [connecting to your data warehouse](/warehouses)
### Troubleshooting
Please see our [Google Tag Manager (GTM) Troubleshooting Guide](/kb/google-analytics/google-tag-manager-gtm-troubleshooting) and our [GA4 Troubleshooting Guide](/kb/google-analytics/google-analytics-ga4-troubleshooting) (if relevant) for help debugging GTM and GA4 integrations with GrowthBook.